Pages

Friday 31 July 2009

UK Art Raffle - 'Summer' entry


The UK Art Raffle is back up and running and the current theme is 'Summer'. You just need to sign up, send in an item of art and then you're in the draw. The winner gets all the items sent in!

For my entry, I altered a jigsaw piece (it measures approx 3" x 3"). I used a vintage picture of three young ladies in their bathing costumes and collaged it onto a background of the L S Lowry's painting 'At The Seaside' a strange mixture and the ladies are not of the same era, but I thought the muted tones of the Lowry picture went well with the image. I painted a wash of cream acrylic over the background and edged and highlighted it with some crayons. A string hanger and some shells completed it.

I used the same image to make an ATC. This time on a background of tissue paper coloured with Brusho paints. Again edged with crayon and some Anita's 3-D clear gloss finish at the bottom to look like water - although it hasn't come out too well in the photo.

All the raffle entries need to be in by 23rd August - can't wait to see if I'm the lucky one, and also to see all the other entries, which I believe, will be posted on the above mentioned website after the draw has been made.

Tuesday 28 July 2009

Altered Coaster Book


This month's challenge on the GAS (Group for Altered Art Swaps) over on Flickr is to create an altered coaster book. Viv who set this theme stipulated that 'Your 'book' may be on any theme you wish but somewhere it must include a stamp and some texture and must be made of at least 2 coasters.( i.e 4 sides)'

I used three identical coasters (cardboard beer mats) which had an unusual shape and cut a square aperture in the first two. I decided to use a clay face (for a change!!!) which I had already painted and was waiting to be used. The face I mounted on the last coaster and with the apertures it can be seen even when the book is closed.

I had trouble deciding on a theme and after looking through my rubber stamps, decided to go with Paris / France. There is a mixture of old and new France in the book though - 'pages' 2 and 3 have a modern street map on and pages 4 and 5 include some vintage French adverts. I couldn't quite decide what the face had to do with my theme - maybe her hairstyle is a chic Parisian bob - or maybe not!
The texture is on the front cover. I built up around the aperture with some Golden Soft Gel and then a crackle glaze over the top of the whole cover. A slight twist on the French flag, I used an old gold colour instead of white to give a more vintage feel and a couple of old French coins. As I said it's a bit of an old/new mixture, but hope that it'll do.

Friday 24 July 2009

ATC - Dolls


These two dolls (Purple Polly and Orange Olive) are on a smaller scale to the others I’ve made - so they can fit onto an ATC. Well that’s what's supposed to happen but due to a … design fault shall I call it … Polly’s legs can’t quite make it pass her skirt! Just as well really in view of the lack of any underwear!!

I found some wired ribbon in my stash and it’s ideal to use for skirts since it can be manipulated into folds without the need for any stitching! I did stitch Olive’s skirt at the top onto her body and her legs are free to move so she fits nicely onto the ATC. With Polly however, I glued her skirt at the sides so therefore restricting her movement. Oh well, I’ll know for the next time (if I remember that is!)

For the faces on these two I used only chalks and watercolour pencils for the features (no pens) and the effect is much more subtle - I think I prefer that - for now anyway.

Thursday 23 July 2009

'Princess Pewter' Paper Doll


Another paper doll. This one I tried to give a metallic look to so used a silver acrylic paint for the skin. Her dress is card covered in silver aluminium tape, embossed and coloured with alcohol inks. She also has some nice dangly jewellery too! Almost forgot to mention her head piece (or crown as she is a princess) it's just a fragment of a CD cut into strips.

Wednesday 22 July 2009

Post It Note Holder


I've made another of these little holders. They measure three and half inches square. I used tissue paper and Brusho paints again (turquoise and purple this time -I love that colour combination) and some co-orindiated coloured beads and paper flowers.

Sunday 19 July 2009

'Love My Friends' Blog Award


The very talented Belinda over on her blog Metallic Dreams has given me this blog award which I'm very happy and honoured to receive - thanks again Belinda.

The 'Love My Friends' Award is given to those bloggers who aspire, inspire and share the most beautiful of human attributes: art, wisdom and friendship. I am now supposed to deliver this award to eight blogger's who must choose eight more. I find this impossible to choose just eight as I love so many of the blogs I visit.

If you are reading this and I'm one of your followers, please leave me a comment and collect the deserved award.

Friday 17 July 2009

Romance Themed Charm Swap


I signed up for yet another charm swap - this is getting to be yet another addiction I think!

This one is being organised by Kim in Canada on her group Paper Digital Art and Images. (Kim has an amazing website with free images and tutorials and is well worth a look)

There are ten participants in this swap and we each need to make 10 charms and get an assortment of 10 back. The theme is Romance - any interpretation and other than that there are no hard and fast rules - any medium, any colour, any base.

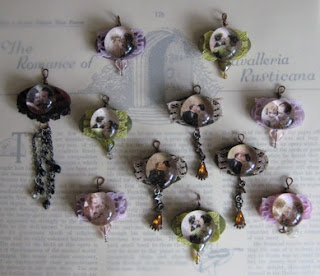
I decided to go along the vintage couples route and use some glass pebbles. I originally wanted to stick the pebbles onto some circular wooden game pieces but they weren’t wide enough to drill a hole through and I couldn’t get beads to stick onto the edge. Plan B was to hunt through my craft stash to see what else I could use and I found some Style Stones which had been collecting dust! They are described on the packet as ‘Inkable Cultured Stone Embellishments For a Timeless Look’ Best of all they have holes pre drilled!

I coloured them using a variety of inks (see photo) and stuck the pebble on to the stones with some E6000 glue. (I stuck the vintage images to the pebbles with Glossy Accents) Further embellished with some lace and beads and ….. Voila!

Friday 10 July 2009

Presents for the Teachers


As the end of the school year approaches the question of what gift to give to the teacher arises. I volunteered to make some presents for my niece and nephew for their teachers and was told they needed five presents in total - as each class has teaching assistants as well as the main school teacher.

I wanted to make something that would be useful and pretty at the same time. After a search on the internet I found just the thing - a Post It Note Holder. Those little sticky note pads always come in useful and to put them in a pretty holder was ideal. I found a video tutorial on Stampin' Academy with Chic'n Scratch which was very easy to follow and also featured the 'Bind It All' machine. I purchased one of these machines many months ago and hadn't touched it so I finally plucked up the courage to use it, and it was so simple I don't know what I was worried about!

For the Post It Note Holders, instead of using designer scrapbook paper, I used some tissue paper I had left over from the 'Babywipe Background' technique as described in the posting on 2 May 2009. Basically, it is tissue paper with a few colours of Brusho paint dropped onto - the colours merge together and they have a wonderful intensity. The tissue paper was adhered to the card with gel medium. For the inside I used old pages of sheet music again coloured with some Brusho paint. On the front cover, a vintage child image, some text and a flower just about completed them. Very easy to do and I'm pleased with how they look.

Wonder if I'll get a gold star!

Monday 6 July 2009

No Sew Fabric Doll No.2


Following on from the post below, I remembered a wooden button I had with a tribal face etched on (purchased from Button-It)and decided to make a totally different type of doll to my usual 'pretty' ones. I used scrim and cotton fibres and lots of little wooden beads to complete the look of this little warrior who is called 'Tribal Tau' I Googled some African boy's names and the meaning of Tau is 'lion' and as he looked a bit wild with his crazy mane of hair, it seemed to fit!

Although this is supposed to be a 'no sew' doll, I did actually use random little stitches here and there to attach the strips of fabric to the wadding core, instead of wire.

Wednesday 1 July 2009

No Sew Fabric Doll


Over at MAD MAMMA's on Flickr the theme for this month's art doll is a 'no sew' one using the tutorial given here.

Here's my doll she's another mermaid called 'Milly'. She was quite quick and easy to make really despite my initial worries!