Pages

Wednesday 31 March 2010

Guest Room Garland


Inspired by a lovely paper garland I saw on Little Birdie Secrets blog I've created one of my own consisting of twelve little dresses (measuring approx 5 1/2" high by 4" wide).


I cut the dresses from cardstock and covered with a selection of beautiful co-ordinating papers from K & Co in shades of pink and green and embellished with buttons, bows, flowers and lace.


It was very simple to make and I love how it looks.  I may hang it in our guest bedroom, or in my craft room.


Then again, I may just have to make another one!

Thursday 25 March 2010

Row Houses Swap

These are my ten little houses for the swap taking place over on Paper Digital Art and Images by Kim.  The theme was 'in a colorful neighborhood' - or as we'd write here in the UK 'in a colourful neighbourhood', and we'd call them terraced houses not row houses - but I love the differences.


Kim provided us with the sturdy little house blanks which measure 2 inches wide by 3 inches high - so they are quite small - her brief said 'this is the chance to create in vibrant colors.  Just in time for spring, lets have lots of bright yellow, lime green, neon orange, hot pink, firetruck red and blue sky!'


I used a variety of different things to create my houses, rubber stamps, inks, acrylic paints, ultra thick embossing powder, rafia, tissue paper, Brusho paints, beads, charms etc - so I think it's safe to call them multi media.

My favourites of the row are the ones below.  I love the little dolls in the Pink and Hawaiin houses which are stamped images from a Hero Arts clear stamp sheet called World Dolls.  The quirky looking house with the pink door is again a (slightly adapted) rubber stamp from PaperArtsy Squiggly Mini series.


I just need to get them packaged up now and sent off to Kim in Canada and wait to see what lovely ones I get in return!

The last row houses swap I did were inchie ones and you can see mine hereI have only recently received my swaps back and here they are in all their glory!


I just need to find a good way of displaying them all - they are far too lovely to hide away somewhere.

Sunday 21 March 2010

From 'Trash to Treasure' Charm Swap


This is the current charm swap over on Paper Digital Art and Images By Kim.

Kim sent all participants a bulging bag full of 'trinkets and trash, baubles, blobs and broken bits' and the idea being to create ten charms using at least one item from the bag for each charm.  Each participant will receive ten different charms back in return.

What fun it was opening the bag of 'trash' and going through it all - then reality struck and I thought how could I possibly make anything from all that lot!  Thank goodness though it was an open theme and Kim had also suggested considering 'window decorations, ornament hangy things and collage creations for artists to use to embellish other projects'.

I liked the idea of window decorations and hangy things as that opened the field quite a bit with regards to size.  So here's a picture of all ten of my finished 'charms'.  They are quite a mix of different things really. 


The two largest pieces are definitely hangy things rather than charms.  They look like a couple of Goddesses to me, and of course I had to get a couple of faces in there somewhere didn't I!


Well Valentine's day may have been and gone for this year, but as there were some hearts in my bag of trash here's what I made with them.


Finally I used some game pieces, which were from my own stash.  In the bag were some cute little nautical charms which I attached to the bottom of Mah Jong tiles.  I uses some postage stamps with ships on to cover the tiles.  The middle piece is a bamboo domino tile (again from my own stash) - I attached the star (from the trash bag) and covered the tile with another postage stamp which I received recently from Canada celebrating the Chinese year of the rat.  This is my favourite of them all.  I am after all a rat myself (in Chinese years I mean obviously - LOL)


This really was much more of a challenge than I had anticipated and although I'm not entirely satisfied with all of the charms, at least I got the job done!  Phew! 

Now I need to start thinking of the next challenge on Kim's site - more row houses to the theme of 'in a colorful neighborhood' a real Spring theme, and the sun is shining today, so that's a good start!

Wednesday 17 March 2010

Dress Up - March

I've created my dress for this month for the Dress Up 2010 challenge.  To see more dresses created by other players, and Margaret's own beautiful one, go to her blog and check out Mr Linky. 

I started off with a white card dress template then sponged two colours all over.  I found some co-ordinating coloured tissue paper which I stuck onto the card using Liquitex Matte Medium.  (All of the original paint is now totally covered up!).  I overlaid some of the blue over the pink tissue at the neckline to make a sort of collar, but it is a bit random really.  I folded over some blue tissue to make the braces and rubber stamped some stitches onto them.  I also rubber stamped a swirly image over the top of the dress.  That's about it really, a bit of a plain one this month.


I'm off to check out Mr Linky now so I can oooh and aaaah over all the other dresses and get some inspiration for next month's dress.

Tuesday 9 March 2010

Pink Goddess Art Doll

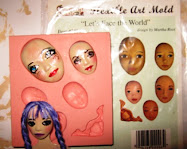
This is another goddess doll using the template from The Enchanted Gallery website.

The template was cut from mountboard.  I painted on her dress with pink acrylic paint then once dry, rubber stamped over the top with an Anna Griffin background stamp.  The pretty little corsage was bought already assembled. 


For her neck and shoulders I painted on some of Ranger's Distress Crackle Paint (picket fence colour).  Once it had done it's stuff and crackled I painted on some gold Perfect Pearls, then sealed it with some Matte Accents.  The gold doesn't really show though and it does look as though the Goddess is suffering from some really dry skin!  Well all I can say is, it seemed like a good idea at the time!


The face is moulded from air dried clay and coloured with a mixture of acrylic paints, chalks and watercolour pencils.


The thing I like best about this doll is her hair!  It's 100% wool, so soft and has a lovely curl to it.  It's from another scarf I bought in the sale in Primark - just £2 I think it was.  As it was so lovely I had to go back and buy another one for me to wear!  I also got one in dark brown, but I'll keep that one in with my craft supplies as it'll also make great hair!
Who thinks I'm mad?  No, don't answer!!

Wednesday 3 March 2010

Stampotique Colour Challenge

Challenge number two over on the Stampotique Designer's Challenge blog is to create something using a Stampotique stamp and with the colours rose, yellow and mossy green.

As Mother's Day is coming up I made my Mum a card using a stamp called 'The Crafter'.  As my Mum's craft is machine knitting and sewing I thought this stamp was good to use since the crafter is holding some scissors and a heart.  I found a lovely relevant quote too 'Love is the thread that binds us'.

I rubber stamped the image onto some cream cotton fabric and coloured around it using watered down Dew Drop Brilliance inks (Pearlescent Orchid and Sunflower Yellow).  I placed a thin layer of batting underneath and machine stitched around the image using green thread then cut out the heart shape with pinking shears.  I finished it off by hand stitching some random cross stitches over the background in green, and in pink around the heart using embroidery thread.

I printed out the words and coloured them with the Pearlescent Orchid ink, then machine stitched them onto the card.  I wanted some of the thread to show so left some of the ends long.  My Mum always taught me to neaten the loose ends whenever I made anything, so I'll have to explain to her that I left these ends showing on purpose. (You'll notice, I didn't leave them too long though - LOL!!)

The three tiny heart shaped buttons near the bottom of the card represent her three children (me being the oldest, then my younger brother and sister).

I don't know if you're the same but the more important the person is to me, the harder I find it is to make a card.  When I used to buy cards in a shop, I'd spend ages and ages trying to find the perfect one and there never seemed to be one quite good enough.  Now I make them, I know they're not perfect, but at least they come from the heart and I know they're always appreciated, especially by my Mum! 

Thanks Stampotique, you made it easy for me this time to make a 'perfect' card!