Pages

Saturday 31 December 2011

Another Triptych ATC - and Happy New Year!!


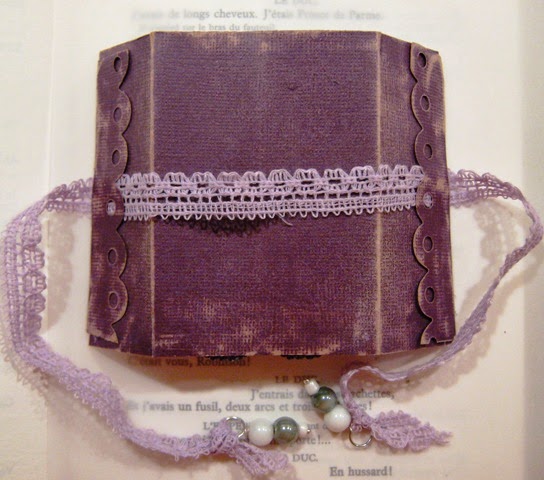
Following on from yesterday's post I made another triptych ATC,
although this is a more formal, serious one - lol!

It's another 'altered head' one and I used a
postage stamp over the head of the stamped image
the idea coming from the 'Postage People' tutorial video.


I used paints to merge the postage stamp into the image,
you can see the edges of the stamp at the neckline if you look closely.

The image is a rubber stamped one this time,
- called ' Madame's Portrait' from B Line Designs.

I added lace and beads to finish it off.


The ATC base is a piece of Tim Holtz' Kraft-Core card
from the 'Nostalgic Collection'.


Well that's about it for now ....

except of course to wish you all a

Happy New Year

and thank you for all your visits and comments
left here on my blog - which still astounds me (the comments
and visits that is, not my blog!!)

I hope the New Year brings all that you want but
most importantly that it is a Happy and Healthy one!

Ta ta for now xx

Friday 30 December 2011

Triptych ATC Swap


The current swap over on the Flickr group
Art 'n' Soul as chosen by Deb
is to create a triptych ATC using one of two formats.
I chose the easier option a gatefold ATC.
The theme is 'Altered Heads' and the head of whatever
image we choose may be altered in any way we like.

I remembered seeing a great tutorial video once
 and managed to find it again called
where a postage stamp was used
over the head of an image in a collage.
I decided to go along those lines too. 

Starting with an image which I cut out - and cut off
the head completely, I replaced it with an old postage stamp.


I then merged the postage stamp into the image by
drawing in the shoulders and joining it to the main image.

Before all that though I started with a piece of white card
covered it with some book text, painted with acrylics and spritzed
 (Crafty Notions - Creative Colour - Spraypaque Fire Opal)
to give it a lovely glimmer.


I hot glued a piece of sari ribbon across the back.
The centre back panel will be covered with
my details before I send it out.


For the front edges I die cut (Alterations/Sizzix On The Edge
'Plaque and Postage') a strip of card decorated in the same
way as the rest of the card.

The little head I cut off from the main image fitted just
right in the hand and appeared to be looking up at the
new head.  It therefore had to become Shakespeare's Yorick
from Hamlet -  the words I used were the best
I could come up with! 

I added three bells to a jump ring and tied them to
each end of the sari ribbon - so it's nice and jingly too!

The deadline for this swap isn't until 15th February
so I'm nice and early!

Thanks for looking :)

Thursday 29 December 2011

Aaron's "He-Art"


I hope you all had a Merry Christmas and enjoyed the festivities
and got all that you wished for from Santa.

We had the pleasure of the company of our nephew and niece
again over the past few days
and following on from my previous post where
Chloe created her own She-Art girl, this time, Aaron (aged 8)
got to do his very own version - a He-Art boy!


Aaron is not afraid to show his feminine side and chose
very glittery paper to dress his boy - he was going for
a football outfit - hence the pink shiny shorts!

His canvas started off with a variety of map pieces from
an old Atlas, then a combination of acrylic paints and mica sprays,
stencilling through sequin waste and using bottle tops etc.
(he did get very messy!)

Aaron chose the words
"Face Your Fears Not Your Tears"
which is a saying he's been bandying about 
ever since visiting the
Adventure Island amusment park at Southend-On-Sea
and watching a roller coaster called 'Rage' 
which he's too young to ride on at the moment.

I think those words were the perfect finishing touch
to his canvas and we both loved what he achieved.

So there it is - "He-Art" or Yeeehaa as we were calling it - lol.

Thanks for looking :)

Wednesday 21 December 2011

Chloe She-Art!


My niece Chloe (aged 11) worked along side me in my craft room over
the last few days and we made some She-Art together.
She was a little reluctant at first, but just look at the
beautiful She-Art Girl she created!


We used dressmaking tissue for the base, then a
combination of acrylic paint and mica sprays
brayered, scraped and stencilled on.


Chloe chose the words 'What's not to love' which were on
printed on her T-Shirt and seemed to fit perfectly!

As Chloe is my little ray of sunshine, those were
the words I chose to put on my She-Art Girl.


Chloe's little brother Aaron was a little upset as he didn't get
to play with us so I've promised next time we'll try to
create some He-Art!

Watch this space!

Monday 12 December 2011

Christmas Card - Simon Says Stamp - Projects with depth


I've decided to make only one special card this year
and it's for my Mum and Dad.

It's based on one of the tags from
Tim Holtz 12 tags of Christmas from last year
- tag number one in fact and you can see it here.

The background is Adirondack dye inks
- Denim for the sky and Lettuce for the land.
I brayered the inks on - Barbara Gray of Clarity Stamps style
- at least that's what I attempted, she makes it look so easy
on her TV demos.  My background is rather flat so I blinged it up
at bit with some twinkling stars (Silver Stickles).

The stamped Santa in his sleigh with his reindeers in front
of the moon is from 'A remountable set of Christmas miniatures'
from Claritystamp.


The house is die cut from Grungeboard using the Rickety House
Bigz Sizzix die and Notebook Texture Fade embossing folder.
The windows have acetate behind them coloured with 3D Crystal Lacquer
- I think an orange colour rather than yellow would have been better
as the the yellow is a bit too similar to the colour of the land.

If you look closely you may be able to see a Christmas tree
through the downstairs window
 (it's actually a Christmas button embellishment).


Can you also see who's peeping around the porch -
if he's there, I don't know who that is in the sky steering the sleigh!!

The fence in front of the house is also die cut from the Sizzix Alterations
range of 'On The Edge' Bigz dies called 'On the Fence'
I glued it down only at each end, thereby creating a bend in it,
 giving it some dimension.

I'm hoping that this card fits the theme on the current challenge at
which is
 "Thru' the Looking Glass - Projects with Depth"
There are some amazing projects full of stunning dimension on
their blog from the Design Team - well worth a drool over.

This is the first time I've joined in with one of their challenges,
so really hope my card fits the bill.

Thanks for looking :)

Christmas Ornaments - again!

Button Floozies

Here are the Christmas ornaments I received back from the swap
 I took part in recently on the Button Floozies blog.


The wire heart green ornament was made by

The red and white candy cane was made by
Zoe who doesn't have a blog just yet

The button Raggedy Annie doll was made by

All the ornaments are completely different and I love them all!
Thank you again ladies.

The ornaments I made for my swap partners were Button Angels
and the blog post showing them is here if you want to see them.

I recently made a couple more for my niece and nephew
who have a small tree of their own in their respective bedrooms
(as seems to be all the rage these days!)


Blue for a boy


and pink for a girl!


We had intended putting our Christmas tree and decorations up at the weekend but after spending the best part of the day sorting out the
garden / greenhouse / shed for over winter we couldn't muster up
any energy and enthusiam to climb up the loft!

We'd better get a move on - as there's only 12 days to go
according the Christmas Countdown Calendar!

Do you want to know what I was doing exactly
nineteen years ago today?


.... becoming a Mrs!

Thanks for looking :)


Friday 2 December 2011

Christmas Button Tin


It started off as an Altoids mint tin


I gathered together some bits and pieces
and gave the tin a coat of gesso


I need not have bothered with the gesso though
as I covered the tin top and bottom with fabric


The flowers I made last year with two punches
one punched out the shape and the other embossed it


I rubber stamped the ticket onto white card,
coloured it and gave it a coat of glossy Mod Podge
to stiffen it.
(Stampers Anonymous - Tim Holtz Collection
'Odds and Ends CMS100')


I kept the inside simple with two
large Christmassy stickers -
I don't normally like to use stickers but these
fitted the bill perfectly and it was really
all about the buttons inside!


I managed to fit in just over 100 buttons
in the tin in the Christmassy colours of
red, white, green, gold and crystal


Ta-da!!!!!!!

Thanks for looking, I appreciate it x