Pages

Saturday 29 March 2014

Butterflies in the Spring Time


I've been making some Post It Note Holders -
and one of them just happens to fit the bill for
 Mrs A's theme this fortnight on her challenge blog -

 Grab My Button. 
(click on the pic to go to her blog)

Whatever you create must have a butterfly on -
and this time must also have the colour yellow.

Here then is my entry 


A bit on the grungy side, but there is some yellow there.
The butterflies are on the postage stamps.


I used kitchen roll tissue paper and coloured it
with some Brusho powders and water.


The lady and words were printed off the computer
and it was all stuck on the covers with Liquitex 
Matt Medium.  A final spray with Crafter's Companion
Spray and Shine gives a nice protective finish.

If you flutter by the
blog, you'll see lots of other butterfly entries,
and there may even be a few prizes on offer!

Thanks for looking :) 

Wednesday 12 March 2014

What's On Your Workdesk? Wednesday, week 249


Another week another WOYWW!
Hello Bloggers and welcome to my desk :)

Being the neat freak that I am I've tidied away
what I've been working on and finished, so you can
see lots of clear desk space.

Here's some close ups of what's actually on there.

 I'm loving the Great British Sewing Bee series on the TV
so when I saw this accompany book at the weekend,
couldn't resist buying it.
I haven't opened it yet ....
 but sure it'll look good on my bookshelf!!

 Another 'couldn't resist' purchase was this little stamp.
I love typing, old typewriters etc, so am sure I
will use this one - someday!

Finally, you may have spotted in the main photo in the
right hand corner a doll ....

I've named her Queen Annie Tique (A.N.Tique).
She was a surprise gift from a very kind and talented lady


My photos really don't do her justice - she's even more
scary in real life ....

 ... but I love her.

Thanks for looking and if you let me know you've
visited by leaving a comment, I'll come over and 
see you too.

Have a lovely day :)


(If you don't know what WOYWW is all about, go and visit
Julia's blog Stamping Ground - she'll have you
whisking around the world in no time!)

Monday 10 March 2014

Introducing 'The Hillary Sisters'


Last week I heard about a 'Country Crafts Competition'
from Jan's blog who heard about it from Craft Blog UK.

The competition is being run by
If you send off for a free sample of one of these
fantastic fabrics from them -

Fabricswatches -hub -FINAL 

and make something crafty with it & blog about it,
 you'll be in with a chance of winning £1000!

So, without further delay, I sent off for a free sample -
I really loved the Bird Parade Teal, but knew I needed
something with a small print for what I had in mind, so
opted forthe Calluna Amethyst.

The very next day this arrived from Hillarys.

I wanted to make some paper dolls and clothe them
in the fabric - hence needing a small print.

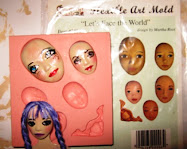
This is briefly how I made the dolls.

From card, cut out the body parts -
and make a head from a mould using air dry clay.

Colour the parts with paint and markers.
I went on to make the facial features with 
water colour pencils and chalk blusher.

 Attach the arms and legs to the body
using small brads.

Now the best bit - using the fabulous fabric
to make some dresses for the 2 dolls -
who I called 'The Hillary sisters'!


 The older sister is dressed in a full length
sleeveless evening gown, accessorised with a 
gold coloured belt and shawl made from sari ribbon.


Her younger sister is wearing a shorter dress
(just above the knee) 
flared at the skirt and sleeves.
Her accessories are matching faux leather
belt and short boots.


 (The faux leather technique is described in
my previous blog post here.)
For the clothes I simply cut out the shapes
freehand from the fabric and stuck onto to
the card body parts with a white glue.


In this photo you can see the weave of
the fabulous fabric.
Oh, the hair, I should mention their hair!
I just happened to have a ball of fibres/wool  
in the exact colours of the fabric.
I do think a trip to the hairdressers is needed though!
Thanks for looking at my entry.
If you want to take part yourself, you only have until
Monday 17th March 2014 when requests for fabric will close 
- you then need to create your blog post by March 31st
 and email it to Hillarys.
Good luck :)

UPDATE:  Winner's entry may be viewed here
To see all the entries, look on Pintrest

Wednesday 5 March 2014

Faux Leather - Fleather!


Yes, another addiction - I love this 'fleather' or
faux leather look.

I made these following the fantastic tutorials on
You Tube by the wonderful Sheena Douglass.
Here are the all important links:-


The finished results really do look and feel like
real leather.  It's amazing to think the main
ingredient to making them is Kraft card!
Sheena uses Glycerine to massage into the paper
to mess with the fibres as a starting point.
Well, I didn't have any and couldn't wait - so I used
some Hand Sanitiser instead which seemed to work just as well.


I did get some Glycerin though
 (from Boots in the cough medicines section)
and made my own 'Fleather Juice' - just add water!

Here's my first attempts (using the hand sanitiser)


I love the texture of the embossing, looks like old, worn leather.

Here's some close ups of the two notebooks I made.


Sheena shows in her second video how to make the closures
using 1mm elastic and a button.


I machine stitched around the edges just for decoration really.

The insides were
lined with fabric.


Each book
had 3 signatures 
stitched into the spine. 


I've never made a book like this before and was chuffed with how these turned out.

Things to note for next time though
~ use enough glue to ensure good adhesion of the fabric to the cover,
especially around the edges
~ take care in cutting the page inserts to ensure they do line up properly. 
~ make sure each signature is in the centre of the cover, on the spine.

I also made a couple of emery board holders following my own
tutorial here


I Love the embossing and high gloss shine
(I used 2 coats of the Crafter's Companion 'Spray & Shine')


Inside, again lined with fabric.


The holders were machine stitched all around.

Did I mention that I LOVE this technique - LOL!!
What next to 'fleather' up?

Thanks for looking :)

What's On Your Workdesk? Wednesday week 248


Well, I had my camera out and it is Wednesday, so
I thought I'd link my desk up to Julia's WOYWW post.

I've just finished a couple of things so there's no work in
progress on show. I've been making faux leather following
Sheena Douglass' YouTube tutorial and I'll be writing up
a full post on that next (I love her technique!).  
As you can see, I've made a couple of notebooks 
and emery board holders (if you're interested in the holders, 
I do have a tutorial showing  how to make them here.

If the cats are not around, I photograph my stuff in the
cats' bedroom  guest bedroom on the white bedspread
on music paper on a sheet of parchment - that's why
the holders are sitting on the music book at the moment -
I've just photographed them and brought them back into
the craft room.  


To the left (to the left, everything you own in the box
to the left - just having an Irreplaceable Beyonce moment!) - 
is my March tag for Tim Holtz 12 tags of 2014.
If you want a good look, I've blogged it here

The rolls of paper you can see - I bought in Hobbycraft
last week in the sale.  They are adhesive fabric paper rolls
 by Papermania/docrafts.  I haven't put them away yet 
because if I do, I'll forget all about them! 

Finally, just behind my Ipad, you may be able to see
some small yellow envelopes.  These were given to me
by my husband who thought I might find them useful.
He kindly donates all kinds of bits and pieces I might
find useful - and sometimes I even do! 

Oh, before I go, see those large scissors in the
first photo?  They are my very favourite scissors, always
sharp even though I use them on paper and fabric -
and where did I get them - in the Pound Shop (in the
decorating section)!  

Better go now or I'll keep rambling and this was
going to be a short post!

Thanks for looking, and if you leave me a comment,
I'll hop on over to your blog.

Tim Holtz: 12 Tags of 2014 - March

DSC08872

 Tim's tag for March is above -
click on the picture to go to his blog and
see in detail how he did it.

2014tags

Here's the tag I created.
 

As I didn't have any of the stamps Tim used, 
instead of a Spring theme, I chose sewing.
(The stamps are from PaperArtsy - HP1216 and
Creative Expressions - Vintage Sewing)

This month it was about getting smudgy with
the stamping - something I usually avoid at all costs!
The effect was very subtle though and just
created a softening around the edges. 

I must admit I had to discard my first attempt
at a tag as I made a mess of spritzing
technique with the distress markers.
I bought the little tool but found it quite
hard to get working - and when I did, found
that the stencil I used didn't give a nice effect.
When I tried again on this tag, I still wasn't
happy but luckily could cover it with some of
the tissue tape as shown below. 


The colours of Distress Ink I used were
Seedless Preserve, Peeled Paint,
Frayed Burlap, Pumice Stone and Black Soot.
I didn't intend the Seedles Preserve (purple) to
be quite a dominant as it turned out to be -
I was a bit heavy handed with the blending tool!
 

I didn't have any of Tim's new coloured jute string,
but did have some garden string in just the right
colour for my tag.


So, it didn't go completely to plan, but I like it!

Looking forward to next month's tag already!

Thanks for looking :)