Pages

Wednesday, 16 March 2011

I've Made A Boob!

Well to be precise, I've made 16 boobs in total
because once I started I couldn't stop!


Why you may ask? 

There's a lovely lady from Norway called
Nina Lise or to use her blog name

She has another blog dedicated to her project about breast cancer
whereby she invites us simply to

The aim is to make 1000 boobs by the end of May.


Plain boobs will be used in workshops and decorated
 by people with breast cancer.


Decorated ones will be used as inspiration at workshops and stitched into Make a Boob quilt(s) which will eventually be donated. 

All the details are on the
 blog together with specific and easy to follow
instructions on how to make them. 
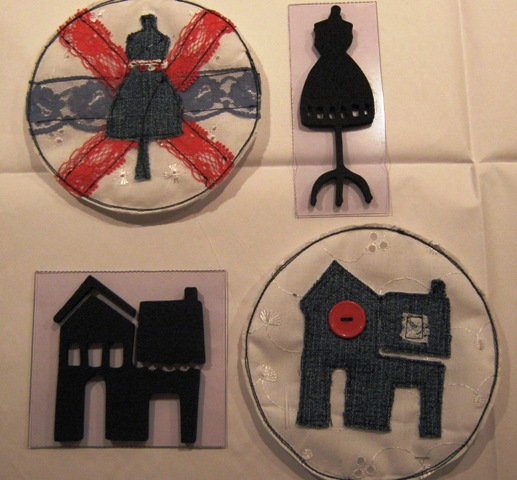


I really enjoyed making these and decided to stick to
a (patriotic!) red white and blue colour scheme. 
All the blue fabric is cut from a pair of my old jeans
(old, but washed and ironed of course!)

For the two above I stamped images (of the house and dress form)
onto the fabric using Claudine Hellmuth's Studio Creative Layers Foam Stamps.  I cut the images out and machine stitched them onto
the background circle of fabric.


For these two, I cut the denim fabric using Tim Holtz
Alterations dies (Tattered Florals and Caged Bird).
The red fabric was quite flimsy and moved around while I was
sewing it, so the circles are a little mis-shapen
(well, that's my excuse and I'm sticking to it!)

If you fancy making a few yourself,
hop over to the Make a Boob blog
 really all you need is a CD (to cut around)
some fabric and wadding
  all the instructions can be found

It's fun, addictive and for a great cause too!


Thanks for looking!


Thursday, 10 March 2011

Finished Canvas - My Homage to OWOH!


On yesterday's WOYWW post, I showed a canvas I was working on
 - well here it is in it's finished state.

During the 'One World One Heart' event I visited over 800 blogs and sometimes blogs were very slow to open - I therefore tended to scribble and doodle on a large piece of scrap paper I had on my desk whilst waiting for the sites to load.  I also used to scribble down the number on the list I was up to and various other bits of nonsense.  It occured to me that this sheet of scribble would make a great background for something or other. (I don't know about 'great', but you know what I mean!!)

Here's the scribbled sheet of paper glued onto the canvas with
 Liquitex matte medium!

 I used water soluble crayons to add the first layer of colour.


Once dry, I added some more


I slapped on some white acrylic paint and brayered it into the background


Once I decided to add a fabric heart, I introduced some of the same colours around the edge of the canvas


Once it was all dry I stitched the heart onto the centre of the canvas with three strands of embroidery thread (it was quite tough to do)


I stamped a few random images onto tissue paper and stuck them onto the canvas with more of the Liquitex medium.


There are two buttons on there somewhere!


The blue flower and green stems in the right bottom hand corner is some tissue paper that one of my OWOH gifts came wrapped in - so how appropriate it should go on too!

Unintentionally then, this canvas has become my
homage to the One World One Heart event!

Mad about cats - two birthday cards!


This is our neighbour's cat who loves to come into our house
 and make herself at home!  Isn't she beautiful, even upside down!


I have quite a long list of cards I need to make for family and friends (what joy!!) and what good timing, some stamps I ordered from QVC arrived today
 and I couldn't resist using them.

Cats 1, Cats 2 and Cats 3
from Personal Impressions
designed by Lindsay Mason


I kept the cards very simple and on this first one stitched
my nephew's name freehand.

Here's a close up


How could I not put this image on the back of the card!


The scruffy blue colour is 'Stormy Sky' Distress Ink.

Here's the second one


The letters are die cut (Sizzix Sizzlet alphabet 'alpha bubbles')
from self adhesive paper (the letter 'n' looks a bit odd -
maybe I cut it in reverse!)
I stamped another of the cats onto the same paper,
and added some 'Baby Blue' Stickle accents.

Another cat of course on the back of the card too!


Not quite as cheeky, but just as cute!

Dylan has four cats at home so hopefully he'll like these cards.

Miaow xx

Wednesday, 9 March 2011

What's On Your Workdesk? Wednesday, week 92


This will be a very short post as there's not much to see on my desk -
a canvas I'm 'working' on if you can call it that! 
A fabric heart which I intend to stitch to the canvas.

To the right there's some lovely cotton lace I bought from a charity shop yesterday - just 50p for two pieces - I think they're doilies and will probably be cut up at some time.

There's also the 'Cloth Doll Artistry' book which I haven't touched
since last week's WOYWW post! 
  I must say another thank you to
though for pointing me in the direction of
 Mary Anne
who has since given me some tips and links on dolls faces
 - so I really have no excuse now!
  Thanks again Mary Anne.

Here's a photo of what my desk looked like last night


You can see the canvas before I started to paint it -
 I'll do another post on that when it's finally finished.

If by any chance you've no idea what
'WOYWW' or 'What's On Your Workdesk Wednesday'
is all about - and you want to find out, hop on over to the
afore mentioned Julia's blog
and all will be revealed!

Thanks for looking - I'm off to have my cup of tea now, before it goes cold!

Tuesday, 8 March 2011

Compendium of Curiosities - The Final Challenge


The last challenge I took part in was number 21 and this last one is number 35, so I missed out quite a few inbetween.
  I couldn't miss out on this final challenge though - using Tim Holtz' fantastic book of techniques called 'Compendium of Curiosities'
- all the challenges have been set by Linda from her blog

This final challenge focuses on the very last technique in the book
 on page 67 and is called 'Design Details'.

I made a Father's Day card and it was great to use up various scraps of paper - some handmade (not by me!), scrapbook papers and there's even part of a bingo page in there too.


You may notice that my stitching isn't spaced evenly because I didn't have all the required tools, but I quite like the effect anyway (I would say that wouldn't I - lol). 

Having pieced my card together, I needed something extra to go on it.
The image I had stamped and coloured a few days ago and it was laying on my desk and the colours fitted perfectly - so it had to go on!  (It's a Stampotique image called 'Bow Tie')

Here's another close up of some of the (imperfect!) detail.


Linda has hinted that although these challenges are now over, she has something else in mind - and will announce what it is next Monday - I'll be keeping tuned to her blog!