Pages

Tuesday, 4 September 2012

A Necklace .... well sort of!


I ventured along to this week's jewellery class alone (and survived!!!)

We made the above necklace - well part of it, I had to finish
it off at home as I run out of time.

I really like the look of it, but you may be able to see from
the photo that the links are not all the same size and some
are a bit on the wonky side too!  Well, I am a novice at all this,
so hopefully in time I'll improve.

The only materials needed were some 1.8 wire and jump rings.
I haven't yet mastered the skill of opening and closing jump rings 
using the tools so consequently have worn my fingernails down quite a bit!

I'm showing below step by step notes of how I made
the necklace, only because in a few days time I'll have forgotten!

We cut 32 pieces of the silver l.8 wire - each piece 
measuring 4cm long (in my case approx 4cm long!)
We then bent the wire around a small bead bottle to
give it the curved shape.


We took five of the pieces are hammered them flat
leaving a little bit at the end to make a loop with
the round nosed pliers.
They were then all threaded onto one jump ring.
This is the pendant for the necklace.


With the remaining 4cm long pieces of curved wire,
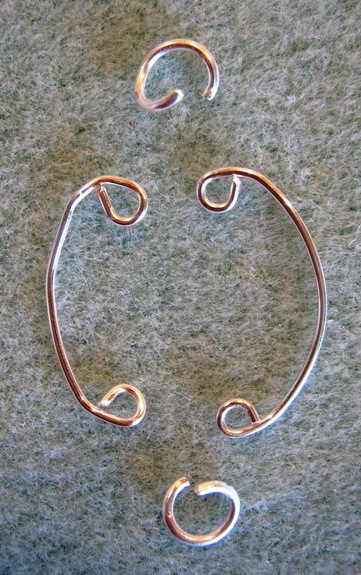
each end had to be looped
 (again with the long nosed pliers)


 These two pieces were then joined together with jump rings
at each end.

 All that needed doing then was joining each link
together with more jump rings and attaching the pendant
in the middle.

We made a 'S' shaped hook for the opening which you
may be able to see at the top of the photo.


All that I need to need to do now is to try and pick
the necklace up from my desk and hope it doesn't fall apart!

Thanks for looking :)

Saturday, 1 September 2012

Craft for the boys - but the girls helped too!

 
Last weekend me and hubby helped Aaron, my nephew make a 
play surface / layout for him to use with his toy soliders / warriors.
I'm not sure what they are exactly, but they're called Warhammers
and everything associated with them is so expensive, so we
decided to have a go at making something ourselves. 

My hubby provided the base board, he'd made several years
ago for a railway layout, but which he'd never used.


The first step was to shape some polystyrene into hillside shapes.

 
The hills then needed to be glued into place -
expertly done by big sister Chloe.


Then the best bit - covering the whole lot with Plaster Cloth.


Once finished this is what it looked like.

 
Once dry, the entire board was painted with some old emulsion
paint from our garage.


The following day, the finishing touches were added.
PVA glue and sprinkles of sand

 
 Then scenic scatter materials
(again from hubby's model railway stash)


It looks a little unfinished to me but Aaron liked
the sand-scape look of it.


Here's a closer shot


Aaron's now happy to have somewhere to fight his battles
(or whatever the Warhammers do!)
.... it didn't cost a fortune and was enjoyable for us to all help make.
Result all around!

Wednesday, 29 August 2012

Another Jewellery Class and Card


Yesterday I dragged my sister to another local jewellery class
where we made the above bracelets - well, she didn't need
dragging this time as she actually enjoyed it last week.

This week's class was much easier as there was no sewing
of minute beads involved.
We used Tiger Tail and threaded on seed beads and larger
beads and evenutally came up with the entire bracelet!

Although I like making the jewellery I don't actually wear it
so my niece Chloe gets to keep mine.
Here she is modelling both bracelets.


She got her new nails last week - a special treat as she
wasn't old enough to join the jewellery class although she really wanted to!

Next week, my sister won't be able to join in the class either
as her children will be back to school and she lives too far
away :(  I have booked myself in, but not sure if I'll be able to
manage without my right arm girl - we'll see, if I'm brave enough!

Finally, a card I made yesterday - with the help of Chloe -
she's getting into this craft lark recently!


This is a Golden Wedding card.
The typewriter is Tim Holtz/Alterations/Sizzix Bigz Die
'Vintage Typewriter'
The backing paper is from a Laura Ashley collection.
Chloe added the gold accents in the lace which don't
show up very well in the photo, she also helped
choosing the papers and lace!
Thanks Chloe!!

..... and of course, if you're looking in
Thank You too x

Saturday, 25 August 2012

Cards and Beads


It's been so long since I last blogged, I'd forgotten my password!
Luckily I had made a note of it, so all's well!

What have I missed - probably loads, will I ever catch up?
Probably not, but I hope this finds you all well and happy anyway.

Last week I dragged my sister along to a local 
jewellery making class where we made the above
beaded flower and hung it on a chain.
I found it really quite difficult at first and was so glad
Kelly was with me as her eyes are younger and healthier than mine
and she was happy to thread the needle for me when required!
She picked the technique up a lot quicker than me too, so when 
the tutor was busy she could explain what to do! 

We're going back next week and hopefully will come
away with a bracelet each - I don't think there's any
stitching involved so may do a bit better.

I wanted to have a go at home and made a card
with a fabric flower and the centre piece was going to 
be a beaded flower


.... only trouble was I'd forgotten how to do it!
Notepad and pen next time I think - lol.

Finally, a couple of birthday cards I made yesterday.


The backing papers are by Laura Ashley
and the one on right is a velvet flock effect.
The dress forms are from Tim Holtz/Alterations
Sewing Room Bigz Sizzix die cut.
I roughly stippled gold paint through sequin waste
on each form.

Our two lovely kittens are getting bigger
and more mischievious by the day.
I've learned to put all ornaments out of reach
(lost two already!!)
and anything dangly needs to be removed, such
as towels or curtain pulls.
We keep most of the internal doors shut now which I don't
like as it cuts out the light, but needs must.
I've also got a fair few scratches on my arms and legs -
can't belive how sharp their little claws are!
We get a 4am wake up call by Leo licking around our faces
- he especially loves John's ears and nose!
Leo is a lot more docile than Lily - and Lily is in charge -
she calls to Leo and he obediently trots along
after her - LOL.


This photo was taken a couple of weeks ago
and they're a bit bigger now.

Thanks for looking - I promise I'll come
and check out your blogs soon too x

Sunday, 15 July 2012

I'm Still Here - but not alone!


I thought I'd better check in if only to say
I'm sorry for not visiting any blogs and leaving comments
recently.

I'm having a little crafting break at the moment
to catch up on other (long neglected) things -
you know how it is!
I'm also taking stock of my craft room and
having a bit of a clear out.

There's also been a big change in our household -
we have two new additions

...... meet the kittens .....

Leo The Lion and Tiger Lily,
well just Leo and Lily really.

They came to live with us last Saturday and are
just 9 weeks old and so incredibly cute. 

I hope all my crafting / blogging friends
are well and I will catch up with you all
soon - I promise! 

miaow, miaow xx
(that's me miaow-ing, not the kittens
as they haven't found their voices yet!)

Take care :)