Pages

Saturday, 21 November 2009

Inchie Row Houses


...and now for something completely different....


Little houses measuring 1" wide and no higher than 4" made from mountboard and decorated to the theme of 'Who lives in this little house?' for a swap on Paper Digital Art and Images By Kim.

I made two sets of five houses.  The first set were mainly inked, rubber stamped, painted and collaged whereas the second set were much more textural - I used wax, tissue paper with Brusho, metal embossing and textural paint.


I prefer the first set but hope the recipients will like them anyway.  The last day for getting them mailed to Kim is not until 30 January 2010 so I am well ahead of the game.

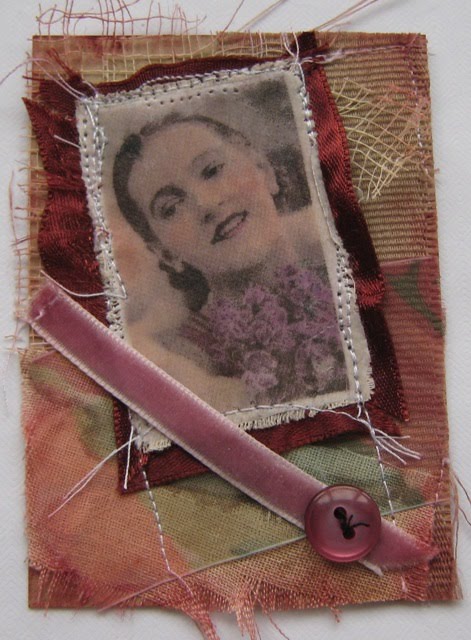
Fabric ATCs - Vintage Ladies


This is the current theme on the Artful Ideas Flickr group and I used a couple of vintage lady images I had in my stash and applied them to some cotton fabric using Golden Gel Medium - Regular Gel (Matte). 


As my proper sewing machine has a broken needle at the moment I used a tiny little machine which just does a basic straight stitch and is so irritating as the cotton keeps breaking in it!  However, I got the two ATCs done (evenutally!) and just sewed an assortment of scraps of fabric and ribbon around the main 'image transferred' piece of fabric.

There are some lovely ATCs in the Artful Ideas photostream already which you see here.

Friday, 20 November 2009

Thank you Trudy!


Yesterday Trudy came to visit me and we spent a very enjoyable day together.  It's the first time we've met in person and she really is a lovely lady - especially as she came laden down with belated birthday gifts for me - LOL.

Here is the fantastic altered frame she gave me and some close ups to show all the glorious detail.


She also gave me loads of other goodies included a tic tac toe game to alter some lovely beads and rainbow crystals and jewellery finings.  Also, a coat hanger to alter - she showed me the one she had altered with some of her jewellery hanging from it and it was stunning - you can see a picture of it in her Flickr photostream here although the picture doesn't do in justice - it's ever more scrumptious in real life!

We also had a play with some toilet roll tubes (as you do - LOL) as I'd asked her about a loo roll tag book she made which you can see here.  She also showed me how to use some embossing plates I had bought for my Big shot a while ago but hadn't yet got out of the packet - it was so easy and there'll be no stopping me now!

Thanks again Trudy for a lovely day, and for all the wonderful presents.
 

Tuesday, 17 November 2009

More Christmas Angels


I made two more angels a lot more glitzy this time - although the photographs don't show up the sparkle very well.

The triangle body is covered with fabric and highlighted with some Ranger's Stickles.  For the wings on both of them, I used old music score then covered that with some gold gauze type fabric - stuck on with more of the Stickles.

These are a lot of fun to make!

Sunday, 15 November 2009

Christmas Angel Challenge


A few weeks back I made a batch of Christmas Angels based on an article I saw in an old issue of Somerset Studio magazine dated Nov/Dec 2006. The article was called ‘Altered Stockings’ by a very talented lady called Nelda Ream-Jinkerson. She made the stockings from vintage sweaters and then applied some mixed media embellishments - her delightful angel being one of the embellishments. You can see a picture of her creation here (just scroll down a little way).

By co-incidence Nancy over on the Art ‘n’ Soul Flickr group, hinted at an angel art-doll as a theme in the lead up to Christmas, and as I’ve been ‘volunteered’ by Viv to be the next guest challenger I thought these angels would be a good idea.


Of course, my version isn’t as pretty as Nelda’s but it is based on the same principle. Whereas hers was made from a shipping tag, I cut a body shape for mine from card and made some wings - here’s the template for what it’s worth!

In short here‘s what to do to make one:


  • find a vintage head and shoulders to use, extend the body template to accommodate the head and shoulders.

  • Cut out the body template (extended at the top to include the head and shoulders) from card.

  • Glue on the head, shoulders and a Christmassy landscape or other design of your choosing to the card template.

  • Glue on a decorative paper to pretty up the back (I used some music score to match the wings).
 
  • Cut out the wings template from card, cover with paper (or fabric or whatever) of your choosing (I used old music paper sprayed with a little Glimmer Mist, Nelma used antique book text)

  • Attach the wings to the body (I attached mine with a button and thread and the button has a touch of gold leaf on it)


  • Attach some lace or other decoration to the bottom of the body.

  • Make the legs with wire, string, or whatever you choose. (I used jewellery eye pins with some bells at the bottom)

  • Attach a loop for hanging the angel at the back


….. and there she is, all ready for Christmas!