Pages

Monday 31 May 2010

From Tablecloth to Rag Quilt Purse!

I joined Mrs Moen's Tablecloth Challenge whereby we had to change our chosen tablecloth into something else!  Although it didn't have to be something quilting related my transformation did turn out to be just that!

Here's the tablecloth I started with, bought from a charity shop.  It is a beautiful white linen with machine embroidered flowers all over.


I remembered seeing a video tutorial for a little rag bag and once I'd tracked it down again I decided to make one with the tablecloth.  It is a fantastic video from Chic 'n Scratch, so easy to follow and it's here.

Who'd have thought you could make a quilted patchwork bag using your Big Shot!  


I didn't have the exact die used in the video, but adapted the scallop tag one I had.  After cutting out all the embroidered pieces from the tablecloth there wasn't enough fabric to complete the bag so I used some pink gingham.


After cutting the pieces out with the big shot I made 19 little fabric sandwiches (with some felt in the middle), and stitched them together as instructed in the video.  So quick and easy to make, the longest part is cutting out all the squares.  


If I'd planned it better the embroidered squares wouldn't have been upside down!  Oh well, I think it still looks fine.

As it is a raggedy bag (by design, not accident - lol), the pieces were sewn wrong sides together so all the seams are on the outside.  This means that the inside is all neat and tidy!


As I'm not an experienced sewer by any means I am so pleased with how this bag has turned out. 

 Thanks  Nina Lise (Mrs Moen) for a lovely challenge.

Saturday 29 May 2010

Dress Up - May


I didn't think I was going to get my dress for May done before the end of the month, but I did!  It's for the challenge set by Margaret on her blog Alice and Camilla  where we create one dress for every month of the year.

So here's mine, ready for the May Queen and I think it looks pretty, floaty and romantic!

The bodice part is cardstock covered with white Plastraw - which is a kind of shiny raffia (I know Gini will like this!)  The rest of the dress is made from a white lining material (nylon I think it is).  I gathered the top of the sleeves and skirt with a running stitch and stitched it onto more cardstock. I left the hems untouched as they were the selvedges and had a border pattern on - very handy as I didn't want to do any more stitching!  As the dress is for the May Queen, it had to have a garland of flowers (even though they're paper ones!)

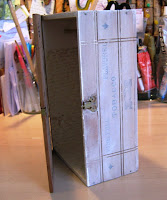
I have at last made a wardrobe for all my dresses - put hubby to work on Ebay and he came up trumps with a lovely old cigar box.


I painted the inside with cream acrylic paint, rubber stamped some text onto tissue paper then stuck it inside.  I also rubber stamped a bird cage at the back (well, we've all got something hidden at the back of our wardrobes right?) 

I cut a small piece of wooden dowling for the clothes rail.  The outside I painted on a watery coat of cream acrylic. I love the lid (inside and out) so have left it untouched.
So there it is, now I have somewhere to keep all these little dresses.


Thanks for looking!

Friday 28 May 2010

Altered Jigsaw Piece - 'Birds of a feather flock together'


Another altered jigsaw piece using the same caged bird die as in my previous post.  More of a romantic, shabby chic feel this time.
The background was painted, glimmer misted then rubber stamped.

The cage was painted first, then covered with Distress Crackle Paint and rubbed over with some gold metallic paste.


It's all cut from GrungeBoard again, except the jigsaw piece which is an actual jigsaw piece - I peeled off the shiny picture first, before painting.

The ribbon hanger was made from a piece of ribbon which was part of a large bag of ribbons I won from Crafty Ribbons!  Here they all are - so lush!


If you would like to be in with a chance to win some ribbons, head over to their post 'Friday Freebie 22' and leave a comment, simple as that!  Good luck.

Just one more picture of my jigsaw piece from another angle.


Hope you enjoy your weekend whatever you're doing.

Wednesday 26 May 2010

Altered Jigsaw Piece - ‘Home Tweet Home’

One of blogs I follow is Clarky J’s Play Space and when I saw her post called 'Are you feeling generous' on my Blogger Dashboard, I was intrigued and had to investigate further. 

Janet was asking if anyone would like to alter one of her jigsaw pieces to the theme of ‘Home’. Well, as I love altering jigsaws this was a bit of a no brainer for me and she sent me her jigsaw blank which measured approximately four by five inches.

I desperately wanted to use my newly acquired Tim Holtz Alterations Sizzix ‘Caged Bird’ die and eventually came up with the tweet, I mean twee wording ’Home Tweet Home’!


I covered the background with scrapbook paper which had the look of old fashioned wallpaper, I thought this would fit in with the ’Home’ theme. However, by the time I’d finished with it, it looked as though the caged bird had escaped and done it’s best to alter it itself!!! I painted some cream acrylic over it, then wiped it off immediately leaving it thicker in some places. The main damage was done with some distress ink though. I smeared some on my craft sheet, spritzed some water on it, then pressed the jigsaw piece into it. It became a very grungy background, but I think it works.


The cage and bird I cut from Grungeboard.  I painted the cage with dark green, then black acrylic and once dry, rubbed some metallic paste over it. I bent it around a little to give it a 3D look and amazingly it stayed in shape! The bird was coloured with gold acrylic dabber paint and when dried, had some text rubber stamped onto it. I used a Glossy Accents to attach the bird to the cage and the cage to the background. The text was just printed off onto copy paper, coloured with distress ink and edged with gold ink and stuck with Liquitex gel medium. A few beads, piece of chain and ribbon and that’s it - home tweet home for the cute little gold bird!

As a thank you Janet sent me this gorgeous little friendship hanger.


Thanks again Janet!

Wednesday 12 May 2010

Nesting Bird


I'm the guest challenger again this month over on the Flickr group Art 'n' Soul and after wracking my brain as to what challenge to actually set, I fell back on the bird template I used last year to make a bird journal.  It's a lovely simple shape and designed by Stampington & Co. and can be found here.

For the Art 'n' Soul group the challenge is to make a mixed media bird hanger using the template and the theme being rather appropriately 'birds'!

My bird was painted with several layers - Mini Meze (Pacific Blue) and Viva Precious Metal (Emerald Green and Purple), there's also a bit of Distress Crackle Paint (Picket Fence) on there too.   I rubber stamped the nest onto white tissue paper and applied it to the bird with some Liquitex (matte medium).  Beads for the legs and eye and a bit of lace embellishment.


I kept the back plain and rubber stamped a bird on (from the same Stampers Anonymous set as the nest (Artful Flight CMS069)).

This gave me an opportunity to make one of the wire and beaded nests I've seen - in fact I do have two I received in different charm swaps and they look so complicated and intricate but really are the cutest things.


Following a YouTube video called 'How to Make a Bird's nest Charm from Beads and wire By Denise Mathew' I made one!  It was very quick and easy to do and although it's not as detailed as the two above, it's an encouraging start I think!  I added a few fibres too.


Just recently we have had a hen blackbird in our garden making a nest in one of our large shrubs.  She was so busy a couple of Sunday mornings ago flying back and forth carrying little pieces of twig and such like - being observed by the cock blackbird from the side fence - funny how he didn't help her - I'll say no more, but bet you're thinking what I am!!  Unfortunately though we haven't seen her since although the nest is still there.  We think (and hope) maybe she's set up home somewhere else. 

Last Sunday we had another bird incident in our garden.  We're often visited by a friendly cat called Sophie who loves strokes and is very sociable.  There was a lot of commotion in our garden, lots of bird noise - and Sophie in her low, crouched pose - I ran out onto the patio to see five baby blue tits squabbling around on the ground - Sophie was too quick for me and had one of them under her paw.  I rushed inside to report this to John and when we went back outside she was nowhere to be seen.  There were two very frightened little birds in a state of shock - but luckily they were unharmed and later flew to safely.  I know Sophie was only doing what comes naturally, but it is a bit upsetting none the less. 

Anyway, enough of my mundane mutterings - if you'd like to take part in the bird challenge, come over and join us on Flickr - the closing date is 6th June.

Friday 7 May 2010

Wooden Heart


The current challenge on the Ready Steady Stamp blog is to create something using at least three of the specified ingredients as shown in their scroll below.


Ooh a wooden heart - "Can't you see I love you, please don't break my heart in two, that's not hard to do, 'cause I don't have a wooden heart"   Well, Elvis may not have had one but luckily I did and it measures approx 4" x 4" just the right size for a little wall hanging.  The angel is printed paper, the hanger is ribbon, the two beads on the hanger are black and there is lace around the edge of the wooden heart.  The stamped wording was embossed with white/silver embossing powder.  The background of the heart is a mixture of acrylic paint and mica powders so it is quite shimmery although it doesn't show up very well in the photos.  The colours white and turquoise are in there somewhere under the layers!

I've now got Elvis in my head (never a bad thing!) so here's some more

"There's no strings upon this love of mine
It was always you from the start
Treat me nice, Treat me good
Treat me like you really should

'Cause I'm not made of wood

And I don't have a wooden heart"
 
Hope you have a lovely day wherever you are!


Sunday 2 May 2010

Stencil It!


Stencil It - that's the current theme on the Artful Ideas ATC Flickr challenge site.  We had to include a stencil somewhere on our ATC and Deb who set the challenge gave loads of links and ideas.

This reminded me I had an electric stencil cutter pen bought many years ago.  I think I only ever used it once to make a stencil border to go around the bedroom wall - inspired by the likes of Linda Barker and Laurence Llewelyn-Bowen.  I used to love the daytime TV programme 'Change That' hosted by Mark Curry - the forerunner to the more popular and bigger budget 'Changing Rooms'.

Anyway, back to the stencil!  I drew a rough sketch outline based on this photo of Chloe - my 9 year old niece.  I hope she doesn't see this as she hates photographs of herself - perhaps she takes after me - I did crop myself out of this photo after all - LOL. 

Using the electric cutter I cut out a stencil trying to keep the eyes and mouth attached to the edge so they didn't fall out.  I lost one of the eyes I think, but it was still ok (just).  I pulled the middle out so had a negative and postive stencil as can be seen from the photo at the top of this post.

I had some ATCs already prepared with tissue paper and Brusho backgrounds so used a couple of those, and the others I sprayed Glimmer mist through onto text.


The one I like best is the one below where I dabbed black ink through the stencil onto an orange Brusho background, although the image is quite smudgy, I like the effect - and it was the best I could come up with!


I think this is a case of practice makes perfect as I found the whole stencil cutting process quite tricky and definitely not as easy as I thought it would be.  I've put the stencil cutter tool back in it's box - wonder when it'll come out again!!