Pages

Thursday 30 January 2014

Tim Holtz: 12 Tags of 2014 - January


JANTAG

I've been thinking of playing along with Tim Holtz
12 tags of 2014 and have finally got my 
act together - just in the nick of time for January.

If you click on the picture above it should
take you to Tim Holtz blog where you can see
in detail exactly how Tim made his tag pictured above.

Of course, I didn't have all of the supplies he used,
but I am pleased with how my tag turned out.

 Originality was never my strong point - and my tag
 is based very closely on Tims.

I didn't have the pocket watch die so made my own
and I used a different embossing folder.


 So happy with this!


  I mounted the tag on a card, creating a simple
background based on the tag.


That's hubby's birthday card sorted.
I'd better put it somewhere safe though as his
birthday isn't until October! 

Looking forward to seeing what Tim comes up with
for February now!

Thanks for looking :) 


Wednesday 29 January 2014

The Seamstress Sisters


Here are my latest paper dolls -
five sisters called
Honey, Bluebell, Holly, Fuchsia & Marigold.
 They are Sewing Fairies.

I made one of these dolls a couple of years back
for a swap
 
 
 and once I'd worked out how I made her
(thank goodness I put a lot of detail in my original
blog post) thought I'd have a go at making some more.

The 'core' of each doll is an old clothing tag.
I had to peel the first (shiny) layer off in order for 
the Distress Stain to absorb into it.


I rubber stamped the dolls body onto card
and machined stitched it to the tag.
The stamp was from a set called
'Paperdoll Parts' from Character Constructions
by Catherine Moore.


There is some random rubber stamping on the back.

I replicated the form skirt with some wire.
This was a bit tricky but I like the finished result.


The 'feet' are two card bobbins stuck together,
covered with dressmaking tissue and Mod Podged
over - then machined stitched onto the body.


For the hair I used hand dyed (not by me)
 mohair fleece.  I love the natural waves in it.
As usual, the faces are moulded from air dried clay.


 The wings I cut from a piece of cotton fabric and
Mod Podged on some dressmaking pattern tissue.
I finished them off with some zigzag machine
stitching around the edge.


This green doll, Holly is my favourite
and she'll be adorning my wall above my sewing machine.


The other four I've put into my
Esty shop

Thanks for looking :) 

Sunday 19 January 2014

Mini Mannequins


I made these mini mannequins when I saw something
similar on Pintrest

The little beauties below were made by an Italian
lady whose beautiful blog is
 Porta-forbicine Mannequin 
I thought I'd use the Tim Holtz/Sizzix die 'Sewing Room'
for the mannequin shape


but found that to be too small compared to a pair of small scissors.
So, I used the Sizzix shape and cut around it to make it a bit larger.


The scissors still dwarfed it though, so I gave up on the idea
of making a scissors keeper manniquin and thought I'd make
a pin cushion mannequin instead.


However, that didn't work because I didn't use enough
wadding and the whole form is quite flat.

So, they are just mini mannequins!


I pinned them to a piece of decorative tape


... but didn't really like them when I hung them from a shelf
above my craft desk.


They are rather cute though and will make nice
little gifts.

I think I've got them out of my system now - or have I!

Thanks for looking :)

Thursday 16 January 2014

The Bag Lady!


Inspired by a show on Create and Craft TV
last week I got my sewing machine out -
not something I do very often!


This is where I sew.
It's the other end of my craft room.

The lady who inspired me on the tele was

 She was selling her kits for small
bags/fabric folders and demonstrated
how easy it was to make one.

I remembered I'd bought one of her books
a while back and sure enough in it 
was the exact pattern for her bags.


They really were very easy to make, although
mine are far from perfect.


This is the first one I made and I think it's the best one.
The ric rac is very wide so shows up much more than
on the other bags where I used narrower ric rac.
I used Tim Holtz fabric for both the main and lining fabric,
as it was only 10 x 10" the finished bag is only
8" wide by 31/2" deep - so could be a pencil or
cosmetic case.
 
I made another again with Tim Holtz fabric.
 

I like the wooden buttons especially on this
fabric with the wooden ruler design on.
(The buttons came from a firm called

I then raided my fabric stash and made one
slightly larger.

 
 Made up, this one measures 10" wide by 6" deep.
(I've yet to add a decorative button as I couldn't
find a suitable one in my button box)
I added a strap to the side - making it a 'wristlet'.
I think this will make a good passport holder
which I'll definitely use.

Onwards and upwards - 

  
This is a similar size to the previous one,
just a bit deeper.  This is a cute one - not
sure what I'll use it for, or who I'll give it to yet.

Finally, I made a couple of gadget folders -
 IPad size.

 
Again, this is from my fabric stash, I wouldn't
necessarily have chosen this particular lining
fabric if I'd had more to chose from.


This could double up as a little cushion or pillow - lol.
I used a layer of wadding which turned out to
be far too thick - at least the IPad will be safe.

For the next one I used felt instead of wadding
which is much better (not such a comfortable
cushion though!)


Now, what else can I sew while the machine's out!!
 
Thanks for looking :)

Wednesday 8 January 2014

Hello Dolly!


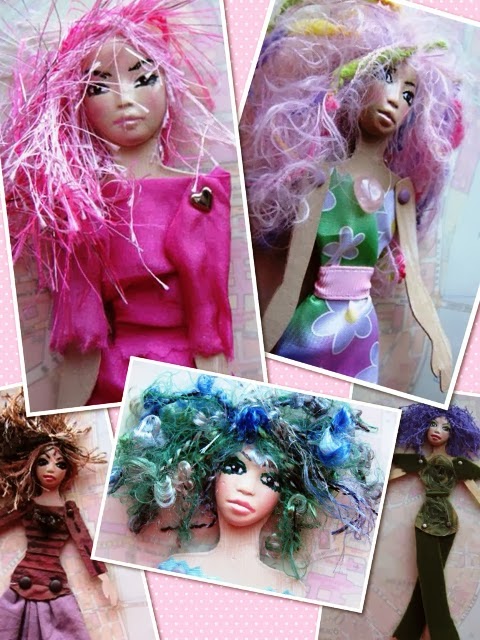
I've made another ten dolls for my Etsy shop

This is the 'Genuine Gemstone Collection'
as each doll is wearing a tiny gem of some sort.
Rosie above for example, is wearing a
Rose Quartz around her neck.

Here's a couple of montages
showing a little snapshot of each doll.

 
 I made the outfits with their particular
gemstone in mind.


Hope you like them and
thanks for looking :) 

New Year, New Challenge

Happy New Year - hope you had a lovely Christmas.

Last year was the quietest I've had on the blogging front
since I started this blog, so this year
 I hope to join in with a few more challenges.
  Well that sounds a bit like a new year's resolution
 and I always resolve never to make
any because I never keep them up!

Anyway, I'll start as I mean to go on and the first 
challenge I've joined in with is on the blog called

"Take one painting that is well known, classical or modern,
 and make something inspired by it
What can I make?
Anything as long as it involves beads!"

The painting I chose is
'Self portrait with a straw hat'
by Vincent van Gogh
 
 
I took inspiration from this painting by using the same
colours - blue and yellow and a little red.

I made a simple handbag key finder

 The large flat bead in the centre is Aragonite
and the yellow faceted beads are Agate.
The red strap is leather.
(Absolutely no chance of not being able to find
your keys in your handbag with this flower
attached to them - it's quite heavy!)

Deadlines for entries is 31 January 
and there is a prize for one randomly selected
entrant.

Now, to find another challenge!

Thanks for looking :)