Pages

Friday 30 April 2010

M is for Mannequin!

I discovered a new site this week called Ready Steady Stamp where challenges are set every two weeks on a Wednesday.  For the current challenge participants are required to use 5 specified ingredients as shown in their scroll below

I made an ATC and used the ingredients as follows:


  1. The letter M - a wooden scrabble tile

  2. The colours - well, they're all in there somewhere

  3. Stamped flowers - I rubber stamped two flowers onto aluminium,  embossed and painted them

  4. Gesso on the background - this was the most difficult part, or the least successful anyway.  I rubber stamped some stitches down the left hand side with Gesso instead of ink.  I think they are just about visible!

  5. Rubber - that was a bit tricky too, but I ended up using part of a rubber band as a belt around the waist of the mannequin.  Luckily it was a dark pink colour so I didn't need to do anything else to it.
The scratchy black background is a rubber stamped image (from Stampers Anonymous 'Slight Alterations' collection), and the mannequin was painted with Claudine Hellmouth Studio paint (Landscape Green) and then covered over with a paper napkin.

This was a fun challenge and I like how the ATC finished up.

Saturday 24 April 2010

Tablecloth Challenge!


I know I like a challenge, but this one will really push me to my limits I think!

I met a lovely lady in cyberland during the OWOH event called Nina Lise from Norway who has all sorts of wonderful things on her blog 'Mrs Moen - the not so secret life of a quilter' - including this 'Tablecloth Challenge' of all things!  The idea is to transform a tablecloth into 'something beautiful or useful or both'.  I don't own many tablecloths and have been looking around for one and today found the one pictured above in a Charity shop.  It's cotton with some lovely embroidery and a lacey edging.  I've no idea at the moment what I'm going to do with it and feel a little guilty at the prospect of cutting it up - however, that's all part of the challenge and I have until 1st June to come up with something.


Nina Lise is also celebrating her 200th blog posting by doing a giveaway with some amazing goodies including a beautiful hand made quilt.  If you're interested go and have a look here.  You have until 9th May to enter.

Now to get my thinking cap on!

Friday 16 April 2010

A is for .... Alice


Here's Alice looking more than a little flushed after her adventures!

Sunday 11 April 2010

French Fashion Doll

Voici Claudette, une poupée très grande en effet!  Thank goodness for the Yahoo translator - I did get a GSE O Level in French all those years ago in school but most of it is in the dark recesses of my (pea) brain these days!
En anglais "Here is Claudette a very large doll indeed".  Most of the paper dolls I make are quite small, whereas this whopper is almost 12" high.  Now that doesn't sound very oo-la-la does it - whopper!  Never mind, I think you know what I mean.


Last October I went to the Knitting and Stitching Exhibition at Alexandra Palace and bought a 'French Paper Dolls' kit from Barbara Willis, an American fibre figure artist.  Her stand there was fantastic, so many amazing creations - I truly was in doll heaven. 

I decided to open the kit this weekend (only six months after buying it!!)  What prompted me to do so was the fact that I didn't go to the Big Rubber Stamping and Scrapbooking show this weekend at Alexandra Palace because I knew I would spend too much money and I already have far too much stuff - much of it as yet unused!  I'm still inwardly sulking though - LOL, even though my hubby was all set to chauffeur, accompany and pay for me to go!  Making this doll made me feel better anyway!


The kit comes with full instructions and templates, some pre printed heads and feet on fabric, backing fabric (which is actually black out fabric for curtains and blinds) and some thick felt (Pelt Tex).  All other fabrics for the clothes you need to provide yourself.

I embellished the face with acrylic paint, watercolour pencils and pastels.  In her hair I stuck on a few beads (some strung and others stuck on loose) and Glimmer Misted a white fabric rose. 


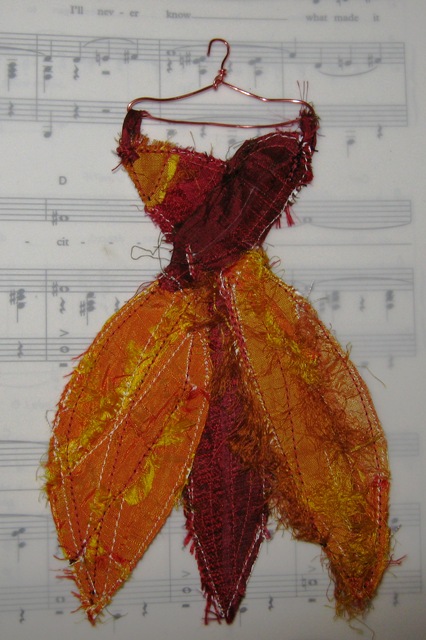
Her apron is part of an old doily and the hanging ribbon thingy at the right hand side below her bodice is actually one of the charms I received from a PDA swap (if you click on the link you'll see the photo of all the charms I received, and the one I used is roughly in the middle of the photo.  It was this charm that I based the whole colour scheme on - well, losely based it on anyway and I'm so pleased to be able to use one of them in such a lovely way! 


To finish the skirt off I added a thin lace edging.  There is a border of wider lace attached underneath to give the appearance of a petticoat.


I liked using the fabric (black out and felt) as a base as it is more movable and durable than paper.  It was however a little tricky glue-ing the fabrics without making the whole thing bulky - something I need to work on I think if I make another.

While I was at Barbara Willis' stand last October, I also bought her book 'Cloth Doll Artistry' - Design and Costuming techniques for Flat and Fully Sculpted Figures.  I've just about covered chapters one and two with this French Fashion Doll so when I'm feeling more adventerous I'd love to have a go at one of the detailed cloth dolls with a fully scultped face!  Stay tuned, although you may have to wait awhile, or until I decide to miss another great crafting exhibition!

Sunday 4 April 2010

Interlocking Hearts Card


These are my first two attempts at these interesting pop up cards designed by Jo.  She has two beautiful ones on her blog here and here.


My first one turned out to be a bit plain although I do still like it.  I used some yellow card for the base and K and Co scrapbook papers.  The hearts I embossed with a texture plate and Big Shot.


I was a bit bolder with the second one but still used some scrapbook papers with dark green card (and brown as I didn't have enough green!)  I embossed the hearts again and highlighted them with some metallic rub on cream.


The inside has some patterned vellum and more of the main scrapbooking paper.  I need to decide where to write a message.  I like Jo's idea of making two layers inside with a lift up flat.  I may try that next time.

I really like the design and the interlocking hearts close up quite securely making a really special card. The most difficult part is deciding how to decorate it!

 Thanks again Jo!

Thursday 1 April 2010

Dress Up - April


It's a fact then, I've another addiction - making little paper dresses!  Here's yet another to add to the several I've made over the past few days. 

This one is for the Dress Up challenge being run by Margaret on her blog Alice and Camilla which is what started it all off for me and I'm loving it - so thanks again Margaret!

This one is for April and I made it with those beautiful red and yellow tulips in mind, that will soon be popping up hopefully, once all the rain and cold weather we're having at the moment comes to an end.  I started with a card base and machine stitched on scraps of silk sari ribbons in a very random manner as can be seen from the close up below!  Yay, my kind of stitching - lol!


I need to tidy up the back - maybe ink all over it, but in the meantime you can see all my lovely stitching - and also that my white bobbin run out and I used the only other one I had filled up - black!


I really enjoyed making this one, especially the freedom of the wild stitching and I think it has a sort of quilted look.  It is quite scruffy looking though, so maybe it can be Cinderella's ballgown - the one she made herself when the ugly stepsisters were sleeping, and before she had been visited by the Fairy Godmother!

More Paper Dresses


'Dainty Dresses' this time to be precise! Well that's the name of the theme set by Judith (aka Scrapdemon) over on her Flickr Art Paper Craft Group.

Judith sets a new paper challenge every month and this month it's to make "make TWO dresses - one with a Spring theme and the other with a Summer theme"


For my Spring dress I used some music score aptly called 'Now Is The Month of Maying'.  I coloured over it with some Scattered Straw Distress Ink and overlaid that with some tissue paper coloured with dampened yellow Brusho powder.  A silk ribbon and paper flower finishes the dress off.


My Summer dress has more of a vintage feel as the colours are very subtle and not bright and summery at all!  I used part of a copy of LS Lowry's painting called 'At The Seaside' - so there is the summer connection!  I couldn't bring myself to cover up the image so simply finished the dress with some lace and a button - and a little distress ink around the edges.

Here's the whole painting


"Now they said his works of art were dull
No room, all round the walls are full
But Lowry didn't care much anyway
They said he just paints cats and dogs
And matchstalk men in boots and clogs
And Lowry said that's just the way they'll stay"
(by Brian and Michael 1978)