Pages

Wednesday 28 November 2012

Finished Altered Sardine Tins - for Christmas

The three way round robin swap I blogged about here
has been completed and I'll show here the finished
altered sardine tins with a Christmas theme.

My own tin, once I did my bit started off looking like this


Lou then added her bit and it looked like this


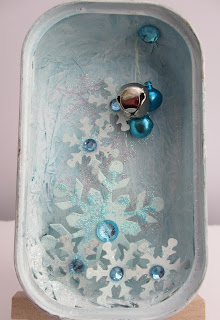
 The tin arrived back today from Sonja who
finished the tin off and it now looks like this -
I love it!


I hope Lou and Sonja won't mind me posting these pictures
of their tins too - before and after.

This is how Lou's tin started off

Then onto Sonja


 and finally me


Sonja's tin started off looking like this


  Onto me next and I blogged about what I did here. 


.. and finally finished off by Lou

What a lovely project to work on this was
and I think all three tins look lovely.

Thank you again to Lou and Sonja.

Monday 12 November 2012

Desert Island Disc - CJ - my page for Donna


This is my first contribution to the circle journal I'm involved
in on the Collabor-ART blog.

This is for Donna's journal.  I say journal, but it is no
ordinary 'journal'!  It is a hand made record box and each contributor
has to decorate these following elements which are in the box.


Donna decided to allocate her songs to each of us,
rather than letting us choose - and for me she chose
.... what? / who? ..... Help!!!
Needless to say I'd never heard of them or the song,
but now I love them, the song is really beautiful!
You can hear it by clicking on the link above if you like.

The artists describe their sound as folk / rockability,
so with this in mind I decorated the holder like this -
which seems sooooo naff now, but I thought it was a 
good idea at the time!


For the record sleeve I printed out the words onto
copy paper and machine stitched them on.
 I went a bit mad with spray inks - adding layer after layer
and did a little rubber stamping too.

This is the booklet inside - I used lyrics from the song


Melancholy in my heart - literally!


More of the same for the back cover


Finally, I added a charm to the outside of Donna's record
box - to add to her already jangly collection!


(Mine is the one with the skull and two pink beads)

I loved decorating my part of Donna's journal
and only hope she likes it too!

Sunday 4 November 2012

Another Tutorial for an Emery Board Holder


If you've been reading my blog for a while you may remember
my original post for a
Tutorial for an Emery Board Holder.

Since then, I've slighty modified the template
making it even more simple!


For this one you need no glue as it's a stitched holder. 

I'll show step by step details how I made the first holder in
the photograph at the top of this post.


I used a pretty K & Co scrapbook paper and cut
a strip measuring 5cm wide by 28cm long
(that's 2" wide by 11" long).
I folded it twice as shown.


I overlocked the bottom of the strip -
this is not essential, but I think gives it a little
more stability.


I rubber stamped some images on the reverse side
of the paper - just the top half as this is the only
part that will show once the holder's finished.


Then I stitched some pretty lace around three sides
of the paper strip (leaving out the bottom side).
I stitched the two buttons on now - for placement
see the template.

Fold the bottom up toward the top as shown and machine stitch the two
sides together, making a pocket.


Fold the top over
and secure closed by
using the buttons -
 leave a tail of thread
on the top button which
can be wound around
the bottom button.


Tuck a few emery boards into the pocket
and it's ready to be given as a little gift!

Here's a few others I made too


Again, these were just strips of scrapbook paper.


For this patriotic one, I used
self adhesive card (denim
look) with a serviette / napkin
stuck to the reverse.


Finally, I made a few funky ones.


These were strips of a lightly patterned scrapbook paper
which I altered by spraying inks through various stencils,
then did some rubber stamping. 
I used some thin ribbon instead of lace.

So quick and easy to make and the possibilites
are endless!

EDITED: 5th March 2014
Here are a couple made out of faux leather,
they are lined with fabric.
My blog post showing how the faux leather
is achieved is HERE.


~~~~~~~~~~~~~~~

The reason I thought of this new template was because the holder
I made originally, and have kept in my handbag has over time become
a little battered and I thought by using lace on the edges 
 would make it a bit stronger. 
This revised template is different and more simple as it no longer
has the flaps at the bottom which needed to be glued - as shown below.

The original template - with flaps!    


I suppose the original template could be used and
machine stitched instead of glued ... but this new template
is easier to cut out - and I like easy!!!

Thanks for looking and if you make a holder
please let me know as I'd love to see your take on it.