Pages

Sunday, 27 November 2011

Christmas Ornament Swap: She-Art Style!


This swap was for the Flickr group
and was to make a handmade Christmas ornament
that included in it's design one or more game piece of some sort
 and the theme was "What Christmas means to me".

Well, Christmas means so many things of course,
but it wouldn't be Christmas without a tree!

The trees in these pieces are made from
chipboard game tiles from a Junior Scrabble set.


Being chipboard they were easy to cut into triangle-ish
shapes with scissors.

My ornaments are small wall hangings.
The base are pieces of balsa wood
which I decorated with some old book text and
music paper then added various mediums to colour
and added a She-Art girl to stand beside the tree.


Each tree was topped off with a 'crystal' from
an old chandelier.


The hangers are wire strung with a few jingle bells.


These are quite grungy and not your traditional type
 of Christmas ornaments but I hope the recipients
will like them anyway.

Thanks for looking :)

Saturday, 26 November 2011

Here Come The ...... Angels


I recently took part in a handmade Christmas ornament swap

Button Floozies
on the Button floozies blog.

The brief was
"Definition of a button ornament:
A Christmas ornament made to hang on a tree or to be a small shelf or table accent, that is decorated with buttons. The buttons do not necessarily need to be the only decoration element of the ornament -- but it should be a main or special element of the decoration. Your ornament should be handmade"


I decided to make some Button Angels as this was a good
excuse to make some more little clay faces which if you are
a regular visitor here, will know I'm just a little bit fond of!!


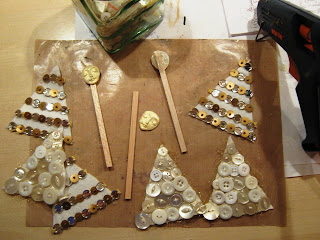
Each angel consisted of a triangle body and wings shape.
Here's my templates - they're crumpled as I had binned them,
but then thought they might be a useful reference to have on this post.


The bodies were cut from white felt (2 triangles for each angel)
A piece of wood to be glued between the triangles.


I hand stitched the buttons on the fronts
(it didn't take all that long really)
For the back I had sequins on a strip of fabric so they
were easily (and quickly) hot melt glued on.
The heads were hot melt glued onto the tops of the wooden sticks.


The wings were cut from white felt too
and embellished with wide gold ribbon
which I needlefelted on.

All the layers were then put together - a little bit
of hot melt glue down the stick and some hand stitching
down the sides and they were (almost) done.


All they needed now was some hair and a crown.


The hair was wool from a scarf
and the crown some glittery ribbon.

Here's some close ups


(Do you like the colour of our bedroom wall by the way - lol)

I glued a loop of gold thread at the back so they could hang.

All the three ladies I was grouped with have now received
their angels and I'm delighted that they are pleased with them.
I also received three lovely ornaments back which I'll blog
about separately.

Thank you all for a lovely swap
and to Laurie of Button Floozies for organising this.


Finally, thank YOU for looking xx

Wednesday, 23 November 2011

The Play Date Cafe - colour challenge PDCC108


The current colour challenge over on
is to create something using the colours
Maroon...Copper...Tumeric


This gorgeous colour combination made me think of
exotic places and spices
.... so please meet 'Jameela' from India.


(sorry about the poor photograph, it's too bright)

Her sari is made from sari ribbon - what else!
Her hair is black embroidery thread.
The bracelets are copper coloured jewellery wire.

The background has in it coppery mica accents from Starburst Stains
which doesn't show up very well in the photographs.
 

Here you can see what's she wearing underneath the sari.
I had a look on Google and found an interesting site about
how to wear a sari, so loosely based this outfit on that.

This colour challenge runs for another week yet
(I wish I realised that earlier when I thought I was too late)
- there is a prize for a lucky participant
and you may even get an honourable mention.

If you want to see some more projects using these colours,
there is a linky dinky thingy here.

Thanks for looking at mine -
and a Happy Thanksgiving to all our American friends xx

What's On Your Workdesk? Wednesday Week 129


I'm sorry to say I haven't played along with WOYWW for ages
but as I had some lovely things in the post today I thought
I'd share them here.


This beautiful little cutie is 'Button Annie'
 and was made for me by the wonderfully talented
It was for a Christmas Ornament swap on a blog called
(if you love buttons, this blog is well worth a look)
I have made my ornaments for the swap too but can't blog
them until I know they've been safely received.


Also in my post today was this delightful shoulder bag made by
which I was lucky enough to win in her recent giveaway. 
 It's velvet and the snowman image is one of her own designs which she digitally printed onto a cotton fabric.
Another super talented person!

What else is on my desk?
A paper doll in progress which I'm hoping to finish today, although
so far all I've done is cut out the arms and body and painted the head!


What do some of you say?  Pile 'em high and push 'em back -
or something like that!
This is an assorted pile of bits and pieces from my stash
 to complete Christmas projects.
I needed some room on my workdesk yesterday to put my
iron and this lot was scattered all over the place
so I just piled it up and pushed it back!

Well, I think that's about it for now.
If you don't know what WOYWW is all about, go have a look at
where all will be revealed - along with over ninety other blogs
for your perusal if you so wish!

Finally may I wish to those of you who celebrate it,
Happy Thanksgiving xx

Tuesday, 15 November 2011

The Craft Barn's amazing giveaway!


Have you seen this yet?
are having a giveaway of
over £200 of crafting goodies !!

What are you waiting for, get yourself over there -
click on either the link or the photo above.

You have until November 25th to enter.
The lucky winner will be announced on their blog by the end of the month.
GOOD LUCK!!

Monday, 14 November 2011

The Play Date Cafe Challenge PDCC107


This week's challenge over at
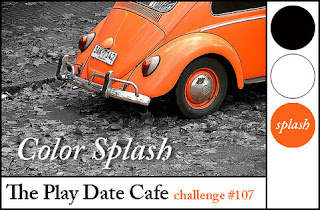
is to create something using the colours
black & white with a SPLASH OF ORANGE.


For my doll this week (who's called Clementine!)
I gave her a black dress with white belt
made from sari ribbons needlefelted onto a piece of white felt.


Her hair is from an old wool scarf and is swept up with
a piece of orange ribbon.
She's wearing a necklace and bracelet of white pearls.

For the background, I used mountboard covered with old text
painted white and added a splash of orange paint here and there.


Thanks for looking and if you'd like to see more of this
colour combination there's a linky thing here.

Sunday, 13 November 2011

She-Art - the journey continues.


I've completed week 2 of this on line course -
click on the picture below if you want more details.


This week it was all about creating layers -
 landscapes and clothing and of course, two more She Art Girls.

I was a bit more adventurous this week and worked on
 artists' canvas board although only small ones
measuring 7" x 5".


For the background of this one, no scrapbook or other papers
were used, just paint, sprays, crayons etc.
Apart from the birds that is, they are gingham fabric.
I originally cut a 'bird shape' from paper,
but as my husband pointed out when I showed him
it looked a bit like a daschund dog sitting on a line - lol -
it really did, and was far too big - so I scraped it off
and rubber stamped two birds onto fabric and am
much happier with the overall look.

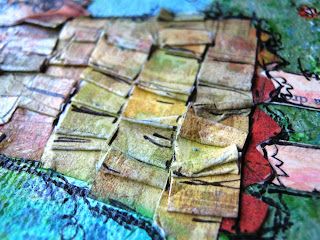
The layered skirt is created with strips of paper
folded up to resemble ruffles.


I think she looks a bit like a bag lady.
Do you remember the lovely song
".... carrying her home in two carrier bags ..."
My bag lady has left London behind for the day
and had a day out in the countryside.

I decided to make the next one a bit brighter.


This time scrapbook paper was used as a starting point
for creating the landscape - then a little bit of everything else!
(I don't think my craft room has ever been messier!)

The dress has a layered skirt.


The words I chose are from a selection provided by
"She knew where she was from"
and this reminded me of another song
My girl - or should I say Marie-Claire has left
".....St Moritz and the others of the jet-set....."
for the day and has joined the Bag Lady for a day in the
English countryside!

The final week of the course is next and it's about
creating a She-Girl based on our own photograph - doh!
Don't like the sound of that, but I'll have a go.

Thanks for looking :)

Tuesday, 8 November 2011

"What's On Your Head" Challenge!


This challenge is over on
and set by the very lovely and witty

The challenge is to make any type of project but there must be something
on the head of the subject.  Gini invites either traditional head wear
or more wackier interpretations - anything goes really!

Well I took the traditional route (quelle surprise!) and used two rubber stamps by Dina Wakley (Create with Abandon and Lonely Girl).

I painted the background, glued an old book page onto card,
rubber stamped the Lonely Girl on, stamped out her crown
and stuck it on with 3D tab and rubber stamped the
Create with Abandon text.

The little fibre bow is attached with a sticky dot.

Sorry Gini, I can't think of a funny story to go with the card,
but I do have a song in my head now ~

"Homely girl, you used to be so lonely
You're a beautiful woman oh yeah"

by UB40 - Beautiful Woman

Thanks for looking :)

Monday, 7 November 2011

Patched with love - finally!


I finally finished this patchwork quilt about half past midnight last night.
It's been a work in progress for several years.

It started off with twelve small cross stitched cards some made by me and
some by my sister many years ago.  They were originally cards for our
Mum and of course she kept them and passed them onto me a few
years ago.  I

Using up some little patchwork fat quarters I bought at craft shows
years and years ago, I put the two together and made something
resembling a quilt!


All the cross stitched 'squares' are grouped together.
As they were all different sizes a few are on their side
(horizontal rather than portrait).


The reverse of the quilt I made up with an assortment of fabrics


The colours don't really 'go', but I liked the large piece of fabric
with the Teddy Bear family and it saved me doing more patching!

I didn't quilt the whole thing as it all started
to pucker up!


I bought some bias binding to go around the edge.


Just look at that perfect stitching - I liked it so much
I stitched over it again and again in places!!!
The problem was the bias binding was too narrow and the machine
stitching kept missing it!

Never mind, it's finished - yay!!!!
I took it to my Mum this morning and she loved it.
Even my Dad said it looked like a real patchwork quilt!
That'll do for me - true praise indeed!


A little pucker it was to do, but totally stitched with love xxx