Pages

Wednesday, 27 April 2011

A Stampotique Sketch!


This is another 'first' for me - making a card using a 'sketch'!

Here's the sketch


It's from the
where the current challenge (set by the Basement Stamper) is to make something with this sketch using Stampotique stamps only.

Looking at some of the Design Teams' creations I'm guessing
that you only use the sketch as a guide and dimensions may
be altered?  If anyone has some advice or guidance on this I'd
really appreciate it.

For my card, I used Stampotique's 'Heart Shirt' rubber stamp.
I coloured him with Promarkers cut him out and stuck him onto
some scrapbook paper. 
I created a shadow around him with Distress Ink (Mustard Seed).

I masked off the background rectangle and coloured it in
with Distress Inks (Mustard Seed and Stormy Sky).

The band across the card I shamelessly copied from one
of the cards on the Challenge Blog - ie, used sequin waste
as a mask and coloured through it with the Stormy Sky Distress Ink.

The word 'Giggle' is a rub on, and mustn't forget
the Crown on the birthday boy's head
highlighted with some Platinum Stickles.

I don't normally like having to make birthday cards, but using a sketch
took a lot of the hard work out of this one, and I think I'll be
using them again! 

I'll be linking this to the Stampotique Designer Challenge Blog
- as this is what they say:
 ".... we encourage you to break out your Stampotique stamps and join our creative design team for your chance to add to your stamp collection with a prize of $30 gift certificate for stamps at Stampotique.  We will randomly pick a winner with the announcement of the next challenge".
Well, it'd be rude not to!

Dimensional Anniversary Card


The background paper is by Blonde Moments - Sugar Dumpling.
The word 'Love' is a rub on.

The hearts are wooden and the niche they're nestling in was created with two
layers of mountboard stuck together and a square cut out the middle.

I followed the technique outlined on Tim Holtz blog
not to the letter, but this is my take on it.

I'm linking this up to Linda's blog
on which her current challenge Grungy Monday 05: A New Dimension
is to create something using this Tim Holtz technique

Click the badge for this week\

I hope this card fits the challenge as it's not particularly 'grungy',
although I did use distress ink around the edges of the niche!


Thanks for looking!

What's On Your Workdesk Wednesday? - Week 99


Hello WOYWWers and bloggers everywhere!
This is the first time I've ever posted my desk this early on a Wednesday
so this is completely unstaged.

I work on the main part of the desk, so the return bit at the right hand
end is usually where I dump things until I get around tidying them away -
that's the part I don't normally show!

Here's what's on the main part of the desk


It's an anniversary card I'm working on. 
 The hearts are wooden and are going to be placed inside the niche.

I must also show you what I won from the multi talented
and all round lovely person Minxy in her giveaway


It's an altered bingo clip board
complete with key hook and pen holders,
beautifully stamped and decorated -
and her card is beautiful too!
Many thanks again Minxy!

I'm linking this up to Julia's blog
where she invites bloggers everywhere to show
what's on their workdesks on a Wednesday!
As I'm so early today (just after 8am) I thought I'd be
up high on the list, but it looks like I may make it under number 50!

I'm early today as my hubby is on leave all this week
and wants to go shopping (yes, really!!) to our local market mainly for a few new plants for our garden.
All I've got to do now is try to drag him out of bed
(I can't hear him snoring anymore so that's a good sign!)

I'll be back later to look around some desks!

Thanks for looking at mine x

Sunday, 24 April 2011

Button It Challenge


This is a challenge set by
who have now added to their beautiful ribbon ranges, buttons!
As I was one of the first fifteen people to email in response to their
'Button it' challenge, they sent me the above button box in the
colour range of my choice - which was 'Autumn Leaves'.
All they asked was that I make and send to them
two projects using the buttons.

I made two wall hangings.


Mountboard base covered with part of an old dressmaking pattern cover
(aged with Distress Inks, metallic rub on paste and gold mica spray).

The dress form and cotton reels are die cut from mountboard using Tim Holtz/Sizzix  ''Sewing Room" Bigz die.  This time I padded the body
part of the form with wadding and covered with fabric. 
 I used Walnut Stain ink to colour the base of the form and made it 
shine with Glossy Accents to give a polished wood look.
The buttons were stitched to a ribbon sash and draped over the form.

The wings were part of an old dressmaking pattern adhered to fabric
with Mod Podge and machine stitched around the edges.

The little sign is rubber stamped (from the 'Vintage Sewing' set by Sam Poole/Creative Expressions) onto card and edged around with 
brown promarkers to look like a frame. 


This one is entirely made from assorted fabric and ribbon scraps.

The main image is a rubber stamp from
PaperArtsy (Dolls Plate 1).

I used the following colours of Distress Ink
to colour the main background and the wide ribbon at the top.
Scattered Straw, Wild Honey, Spiced Marmalade, Fired Brick and Forest Moss.
The ric rac hanger was white and coloured with the Spice Marmalade
and a little of Fired Brick Ink.

For 'Button Queen' I used a small alphabet set (a cheap one
from Hobbycraft) to make the words, stamped them onto fabric,
cut out and machined stitched them on.

Oh, and there's a few buttons here and there too!

Thanks for looking and I hope you're having a
Happy Easter xx

Wednesday, 20 April 2011

What's On Your Workdesk? Wednesday Week 98


This is actually what was on my desk yesterday afternoon.

There was my box of embroidery threads -
the ones on the left of the photo all neatly arranged
and on the right, the rest of 'em.

There was a selection of autumnal coloured buttons I received
 for a button challenge.
(I'll be posting about that in day or two probably)


Here's the wall hanging I've been making for the button challenge.
I've almost finished it now - but have to do one more button project too.
You may have noticed I HAD to sort all the buttons into their colours
before even thinking about what to do with them!
Also on the desk a hot ribena to ease my sore throat - which today
remains to be sore - doh!  At least my bad back feels a bit better today.

Enough of my ailments!  If you want to see what's on other
peoples' workdesks today, go an have a look at Julia's blog
where you'll find loads!

Thanks for looking and I hope your weather has been
as glorious as it's been here today!

Happy Easter to everyone too xx

Tuesday, 19 April 2011

Collaged Postcard


The current theme on the Flickr Art 'n' Soul challenge group
is to make a collaged postcard from any material but it must have on it somewhere something metal.

Last week I found an unusual postcard in a charity shop,
a wooden one!

Front

Back

The background is a combination of acrylic paint and Distress crackle paint.
The word 'wish' is a rub on and the floral flourish a rubber stamp.
I added a bit of old text top and bottom
and edged with some metallic rub on paste.
I finished it off with a shabby bow with the metal flower in the centre.

Here's the back


I've never attempted one of these collaged postcards before
and am pleased with how it turned out.

It measures three and half inches by five and half so it's slightly smaller than the challenge calls for.
 Maybe I'll be keeping it after all!

Wednesday, 13 April 2011

What's On Your Workdesk? Wednesday, Week 97 - BOOKS - anyone want them?


I've been trying to make some space on my bookcase and found these
books which I've had for years and hardly ever looked at.

I was going to put them in a charity bag, but wondered if any keen scrapbooker or card maker would like them instead.

I don't want anything for them, just pay for the postage and they're yours!


I'm linking this up to Julia's blog
where she invites bloggers to share what's on their desk.

Julia is nearing the second anniversary of her popular WOYWW posts
and a special 'pass it forward' event will take place on
the 104th week which will be on 18th May.
All the details can be found on Julia's blog here.

In readiness for the event, I have already made a gift
to 'pass it forward' but we're not allowed to reveal it until
the day.

Sssh, dont' tell Julia, but here's a little sneak preview
of what I've made.


I know I'm in real trouble now - so am off to hide!

Happy WOYWW if you're a WOYWWer
and happy Wednesday if you're not!

Thursday, 7 April 2011

Sew What?


This 'Sewing Room' Bigz die by Tim Holtz Alterations/Sizzix
is my current favourite and as you can see from the photo above
I cut a few shapes from mountboard.


Although the mountboard is quite thick anyway, I stuck three
layers together with Liquitex Matte Medium
and the forms now feel a bit like wood, nice and sturdy.


I attached old music paper and book text to the forms.


Coloured with some water soluble crayons
and made some wings with cotton fabric and dressmaking tissue.

Here's what they look liked finished


Here's some close ups


I covered this one with Distress Crackle Paint (Clear Rock Candy)
and once dry and crackled, rubbed some Distress Ink
into the cracks (Dusty Concord).
I had some of the seam binding ribbon left over
from a previous project so that became a belt.


The other one was totally different, very grungy.


I really like the wings.
They are a layer of cotton fabric, dressmaking pattern
and a few layers of Mod Podge.
I machine stitched around the edge once totally dry.
They're adhered to the back with E6000.


This shot (above) shows just how thick the three layers of mountboard are.


.... and finally here's what the backs look like.


Which do you prefer, pretty or grungy?
I think I'm leaning towards the grungy, but then again I like the pretty!
(and no, I'm not mentioning Harry Hill - lol)

Thanks for looking x

Tuesday, 5 April 2011

'Simply Square' Crafty Individuals Challenge


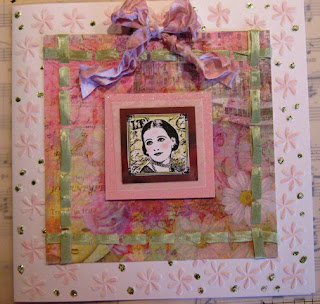
I made this birthday card for the first challenge on the
which is based around 'Simply Squares'
and there is a requirement to use at least one
Crafty Individuals product.

I used two products, the first being the beautiful background paper
from 'Book 5' (Travels in Italy), and a rubber stamp from the set CI-238.


I lightly coloured with image with water colour pencils
and matted and layered it with some mirri, vellum and sparkly cardstock.

Around the edge, I laced some green ribbon and made a shabby chic
 bow with seam binding coloured with distress ink.


(Now for a bit of self critique)
On reflection I should have left the background card plain
instead of adding the Stickles - I must remember 'less is more'! 

It wasn't until I posted the photograph here I realised my square
matts around the image were in fact not very square at all -
I must remember check before glueing down! lol

Never-the-less, I still like the card and enjoyed the challenge.
Thanks for looking x

Sunday, 3 April 2011

The 'Sewing Fairy' Art Doll


She was going to be a 'sewing witch', but she looks too serene so she's a fairy instead!  She's retired from active sewing service now - you can see
her greying hair and vintage wings.  However, she still likes to
have a little dabble now and again on her sewing machine.


Her head has been moulded from air dry clay
 and coloured with water colour pencils.
Her hair is from an old woollen scarf.

Her body is a Catherine Moore 'Character Constructions' stamp.


I used wire to try to replicate the wire form of the stamp
and attached some random beads and sequins.


They (the beads and sequins) can be moved up and down as I couldn't work out how to keep them in place!

Her 'feet' is a bobbin which is made from three
die cut shapes in mountboard, stuck together and coloured with
Distress Ink.


This is the back view of it (I know, you never would have guessed!),
 It's attached to the body with E6000 adhesive.
I used Tim Holtz Alterations 'Sewing Room' Bigz die.


For her wings, I cut a rough shape out from an old
dressmaking pattern and Mod Podged it onto some cotton fabric.
I applied several layers and once completely dry,
machine stitched around the edges a few times.
(I also applied a little distress ink too)

I'm pleased with how the wings came out as they have a leathery feel to them - not that I have a thing for leather you understand (!!!), just that it makes
them a bit stronger and they are nice and tactile.

Here's what the back looks like -
you can see I used a bright orange clothes tag
for the main part of the body of the doll.


I think I'll name her Matilda, not sure why, she just looks like a
Matilda to me!

She'll be flying off to a new home soon - I hope she'll have a
sewing machine at her disposal, otherwise she may develop
bad witchy tedencies!