Pages

Friday, 29 October 2010

Compendium of Curiosities - Challenge No. 19 - Extreme Masking


The current challenge being set by Linda over on her blog Studio L3 is 'Extreme Masking' which is a technique on page 61 of Tim Holtz' fabulous book called 'Compendium of Curiosities'.

I started off making a mask using one of Tim's Alterations Sizzix dies - 'Branch Tree'.

Here's the colours of Distress Ink I used


It was quite by accident, due to not placing the negative mask in exactly the right position, that the white outline was created.  I thought this looked at bit like moon shine, so hightlighted it with some Crystal coloured stickles and coloured the moon in the same way.

In the first photo you can see the mask itself - I really like how this turned out so will be using that some time too.

Thanks for looking!

Thursday, 28 October 2010

Self Healing Art Course - week 2 (part 2 of 2)


Following on from my previous post....

The second spread in our board book was to include a whimsical character and be based on a childhood trauma and our page needed to be the opposite of said trauma.  Fortunately I didn't experience any (as far as I can remember) and so my spread was to be based on a happy memory instead.

Rather than focusing on anything in particular (this was the hardest part, deciding what to do!), I used lyrics of the first pop songs I can remember hearing as a child.  Namely, and I've included links on YouTube so I can go and listen to them again whenever I feel like it!
Grocer Jack by Keith West - Excerpt from a teenage opera (1967)
Little Boxes by Pete Seeger (1963)
Little Arrows by Leapy Lee (1968)

My page included two whimsical characters - one is me and the other my best friend, my Mum!  This wasn't a conscious decision, I did one and then another and it just looks right.   They were painted onto watercolour paper, cut out and glued onto the background.


My characters aren't perfect - even though I've now got some of the 'proper' crayons!  It really isn't as easy as Tam makes it looks - I guess I'm not a natural at this, but I'm going to have a lot of fun practicing I think.

Here's some close ups - I must be mad!


What a funny mouth - and it looks as though I have a bad case of dandruff - it's supposed to be shine!  Why have I got talcum powder on my forehead and down my nose - hehehe!!


She's much prettier!  Beautiful green eyes, but still a bit of dandruff!

I enjoyed doing the background.  Book text, water soluble crayons, white acrylic paint, more crayons, rubber stamping, printed text coloured with the crayons, more white acrylic paint and rubber stamping.


I know I haven't quite got the whole 'cohesive' thing absolutely right yet and I was rather heavy handed with the shadowing around the characters.


I do still like the finished pages though, and as I said before it's all a learning process and we learn by our mistakes after all.  The main thing is I'm enjoying the process - it's a lot of fun!

Thank you again Tam - wonder what's next!


Self Healing Art Course - week 2 - (part 1 of 2)


Week 2 of the on line course 'Art, Heart and Healing' offered free by the very generous Tam on her ning site Willowing & Friends was all about altering a board book and taking us back to our childhood.

The first spread (two pages in the book) was to incorporate an acrylic image transfer of a childhood photograph and then messages of what we would have wished for ourselves.  Obviously I wished for happiness, good health and love and fortunately I have been blessed with all of these things, but rather than including those I decided to use the words of a lovely song I remember from school and still sometimes sing it to this day! 

 'Glad That I live Am I'.    

  For my spread I used this photograph of myself as a young child


I've done image transfers before quite sucessfully, but not this time!  I had three or four attempts at it and the finished result is far from perfect.  I dared not rub any more of the paper off for fear of the whole thing rubbing off again.  I think I went wrong with my preparation of the board book.  The pages were super shiny, high gloss - and I should really have either peeled the first shiny layer off, or have given them a good sanding.  As it was my gesso kept peeling off.  I tried an acetate transfer for the first time.  I printed the photo sucessfully onto the acetate, but failed miserably when trying to transfer it - it seems that using an inkjet printer is no good for this technique and a toner based one would be better.  In the end I transferred an image printed on paper (on my inkjet printer) and it certainly has a vintage feel - lol.  Note the strategically placed flowers on the image - covering up some holes in the paper.

I think this must be the grungiest thing I have ever done - but I do quite like it!  The background was gesso, gesso, gesso (as it kept rubbing off!), water soluble crayons, white acrylic paint brayered on, printed text, more white acrylic and rubber stamping.  Unfortunately when I coloured the printed text with crayons and diluted them with water, some of the words smudged quite badly - all adds to the grunginess of it I suppose.

I'll do a separate post for the second part of this week's course, otherwise this post will go on and on and on!

Wednesday, 27 October 2010

What's On Your Workdesk? Wednesday (week 73)


This is what my craft desk looks like today - if you don't know why I'm asking 'what's on your workdesk', hop over to Julia's blog 'Stamping Ground', where you'll be able to find links to over 100 other desk to have a nose around should you feel inclined to do so.

Back to my desk - the figures are my attempts at whimsical characters and the book at the back of them is the first two pages of an altered board book - both projects are for the second week of an online course called 'Art, Heart and Healing' being offered free of charge on the 'Willowing & Friends' site.

Oh you can also see my shiny new crayons I've got especially for the course from the online site Artifolk who were recommended to me by two lovely blogger friends.  I found an old glass jar to keep them in - the crayons that is!

I thought you might like to see what's above my desk - I have two large shelves the first of which is full of little plastic containers


They contain all sorts of crafty goodies and maybe I'll show what's inside one every week (just in case there's nothing else of interest on my desk!)


As they are made from clear plastic it's easy to see what's inside them.  I bought them from Aldi last year, I kept going back to buy more as they are so useful and look good too.


You can also see some wire mesh drawer units in amongst the plastic ones, these were a Christmas present from my sister last year.

Maybe I'll show you what's under my desk next week - although that would involve me having to get the vacuum cleaner out so I won't make any promises - lol !

Thanks for looking - I'm off to have a look at some of the other desks now.

Saturday, 23 October 2010

Self Healing Art course - week 1


I've completed my first assignment for the Art, Heart and Healing course that I blogged about here.  (The name of the course has changed from 'The Heart of Art' to 'Art, Heart and Healing').

I'm feeling very pleased with myself as for a first attempt I like it!  I didn't have the correct flesh colour tones water soluble crayons, but did buy a few watercolour pencils from Hobbycraft this week and couldn't wait to start! 
  
Here's the complete page which unfortunately is very buckled under the weight of the various layers - I bought a sketch book with cartridge paper pages which looked and felt quite thick and sturdy, but they buckled none-the-less!


I enjoyed drawing and painting the eyes the best - I've always liked doodling eyes, although just one so it was a challenge trying to get two the same!  I've never drawn a nose before so that was the hardest thing.  I was pleased with the mouth, although the colour could have been better.


The most difficult thing was the shading on the face, and that is one of the most important things really.  I only had a few colours of watercolour pencil to work with and the shading does leave a lot to be desired (what's that about a workman blaming his tools - lol!)  I am going to invest in some water soluble crayons in flesh tones (when I find out where to get them!) so hopefully (and with a lot of practice) my technique will improve.

The background was fun to do - scribbling with crayons, brayering with acrylic paint, rubber stamping, more paint, more stamping.  My background has turned out quite pastel and on reflection it could have done with something else - or bigger font for the words, but it is all a learning curve.

Here's a couple of close ups of the background


I'm looking forward to part two of the course now and if you want to join in too, you can at any time until the course ends (in 3 weeks).  The video tutorials for week one will stay on the site until at least the end of the course.

  I must again say a huge thank you to Tam who is such a generous spirit offering this course completely free of charge.

Finally, am I self healed as a result of this excercise?  Well, let's just say I'm getting there!

Thanks for looking xx

Friday, 22 October 2010

Metal Flowers Birthday Card


This one is for my husband whose birthday is next week.  Although it has flowers on, they're made from thin metal (Ten Seconds Studio) so it's made them into masculine flowers - LOL.  He's a keen gardener (when he's not at work, or glued to the computer spending his hard earned dosh on ebay - still as I always tell him you earn it, I burn it oops, you burn it!) so I know he'll appreciate it.

I used the flowers and leaves stamps from this PaperArtsy set (HP1004)


Using Timber Brown StazOn ink (because my black had all dried up!) I rubber stamped the two flower shapes onto metal and once dry snipped between the petals and manipulated them to look a bit like flowers.  I say a bit because I was quite pleased with them until I looked at the sample I had from LB Crafts which has an amazing flower on - still, for a first attempt I'm still quite pleased.  I glued metal buttons in the centre and added a few sprinkly bits.

The leaves I stamped onto book text and spritzed with a mica spray - it doesn't show up in the photograph.

For the background, as you can see I used an old book page - it was so old that I only had to distress two sides of it and it's naturally brown with age around the edges.  I used it for the background as the fact that I tear pages out of perfectly good books is always a source of great consternation to John - heheheh, I'm such a tease!!

Here's a close up of the flowers


The colour hasn't come out right, but you get the idea.

Thanks for looking - I'm off to tear out some more pages now, before John gets in from work!

Thursday, 21 October 2010

Compendium of Curiosities - Challenge No. 18 - Dabber Resist


'Dabber Resist' is the current challenge set by Linda over on her blog Studio L3 relating to page 37 of Tim Holtz book 'A Compendium of Curiosities'.  I made a birthday card using the technique with two Distress Ink colours - Vintage Photo and Old Paper and Snow Cap paint dabber.  (I outlined some of the circles with black Stickles and the number 40 is a wooden bingo disc also outlined with Stickles)

 Although the technique calls for a rubber stamp to be used, I wanted the card to match a tin box I altered with metal embossing, so I dabbed paint onto the embossing folder and used that as a stamp instead.  It worked really well giving a good impression, although I had to make sure I washed all the paint off the folder thoroughly.

Here's what the box looked like before I altered it - with the three foam initials I put on the lid.


I cut rectangles of metal (from Ten Second Studio) for the top and sides, run it through the embossing folder ('Retro Circles' from Sizzix Alterations range) and lightly sanded the surface.


I encased the foam letters between sticky tape and a smaller rectangle of metal and burnished around them.  I rubbed black acrylic paint over them and once dry, again lightly sanded all over.

It's filled with the birthday boy's favourite sweets, so even if he doesn't like the tin all is not lost!

Wednesday, 20 October 2010

What's On Your Workdesk this Wednesday?


Why am I asking what's on your workdesk?  If you don't know already, hop along to Julia's blog Stamping Ground where she invites bloggers to share what's on their workdesks - and we all like to be nosey don't we!  Well, I do anyway - lol.

Yesterday I received a lovely packet of crafty goodies which I won as blog candy from Cath on her blog Notes from a Divided Island.  Here's a more close up photo.


There are some lovely fibres, lace, game pieces, dictionary pages, word charms, envelopes and even a little acrylic stamp of the map of Cyprus where Cath lives.  I also love the two vintage style tins - one for Christmas and the other for Halloween containing stickers, and not forgetting two lovely glass magic eye (I think that's what they're called) beads.  Thank you again Cath!  I would never have seen Cath's blog if it hadn't been for WOYWW, so thanks go to Julia too!

I received another packet yesterday too containing this lovely post it note holder from Viv - this was for a swap on the Art 'n' Soul Flickr group I belong to.  In the first photo above you can see it open, but here it is closed in all it's majestic glory - isn't it gorgeous!


On the first photo at the top you may be able to see (on the extreme right hand side) a paper with a girl's face on - don't laugh!  This was my first attempt at a journal page which had to incorporate a portrait representing me.  I couldn't finish it as I didn't have the right flesh tone coloured water coloured crayons (does anyone know where to get them in the UK - I tried a few places today without any luck).  The journal page was part of a free 'self healing' art course I've joined called The 'Heart of Art' and if you're interested in joining there's more about it on my earlier post here.

This is turning out to be a post of thanks - 2 more to go -

Thank you Elizabeth (of Bleubeard and Elizabeth fame!) for featuring me on your blog Altered Book Lover.  I've never been featured on anything before so I'm feeling all special now - lol.  Seriously though, thanks!

Finally, thanks to all those of you who last week commented and suggested ways of helping me when I had trouble with uploading my photos onto Blogger.  Although I'm still experiencing the same difficulty, I have now ensured that all my privacy settings are ok on the Picasa site, so that's some peace of mind at least.  I see that Blogger will be doing some maintenance this evening disabling photo uploads for two hours - it will be interesting to see what happens after that!

Sorry this has become a very long post, if you're still here - thanks for visiting and if you leave me a comment, I'll definitely be along to visit you too!  

Sunday, 17 October 2010

Stampotique Challenge: Treat Container


The current challenge on the Stampotique Designer Challenge Blog is to make some kind of container suitable for Halloween trick or treating.  I made two little bags.

Although it wasn't a requirement this time to use Stampotique stamps, I did use two as the images are rather creepy - in a lovable sort of way and so fitted the Halloween theme!


Moth Fab

Prom Queen
I stamped the images onto white cotton then used Distress Inks as watercolours. (Swiped the ink pad over my craft mat and picked it up with a water brush and painted around the images). I really like the effect and intensity of colour. If I'd taken a bit more care the colour wouldn't have bleed into the faces - still, I'll know for another time.


I sewed the images onto some black and white gingham fabric, then onto some scrim fabric.  I made a basic bag for each image. The handles match the lining - ideally the handles would have been wider, but I was using scraps of fabric from my stash and didn't have enough.


A couple of pumpkin buttons are sewn onto the base of the handles, and that's it, they're ready to be filled with Halloween treats!

If you hop on over to the Stampotique blog, there are some wonderful treat containers displayed on there.

Thanks for looking!

Friday, 15 October 2010

ATC - 'You Can't Scare Me'

The current theme over on the Artful Idea's ATC flickr group is 'You Can't Scare Me'.

I remembered seeing this image of a woman on Pringle Hill Studio blog recently who fits the bill.  She looks pretty formidable and I don't think much would scare her!

The background is a mixture of old music score, an old baby wipe, distress ink, gesso and rubber stamping.

I called her 'Queen of Mean' and used a new font I found yesterday  from ScrapVillage where you'll find every sort of font you can imagine (for free!)

The font I used is called 'failure'.  I printed it off and coloured the edges with a little Distress Ink.

Her crown is a plastic embellishment I coloured with Perfect Pearls and a little Stickles glue.

Thanks for looking!

Wednesday, 13 October 2010

WOYW? Wednesday 71


Or 'What's On Your Workdesk' this Wednesday - the question asked every week by Julia on her blog Stamping Ground

Firstly, thank you if you stopped by last week and left me a comment.  I did manage to visit almost all of the desks last week which was a mammoth task I must say - but well worth it - I love having a nose around!

This week, on my desk is mainly flowers and leaves.

I thought I'd better use some of the new punches I bought recently so made some little Poinsettia flowers.


I punched out a lot of flower shapes from red cardstock then swiped them with a bit of gold brilliance ink.  Stacked them in threes glueing (or is it gluing) together with Glossy Accents.  I sprinkled a few glittery bits in the centre.

They're not the exact flower shape for the Poinsettia, but I think they'll do - I just need to make some dark green leaves to go underneath - then decide what I'm going to do with them!

I've also been making some leaves - after seeing a brilliant tutorial on a new blog I discovered this week called Ink Stains.  All you need is brown paper (I used an old brown envelope), Distress Ink and Glossy Accents - it is really so easy and produces lovely results.


This is the only leaf punch I have, but want to get some more now!


Can I take this opportunity to ask about how you upload your photos onto your Blogger posts?  The reason being I've had terrible trouble with this post - I could only load one photo direct from my hard drive on the post and after several attempts, had to end up using the 'Picasa Web Album' (which I didn't even know I had, and even more surprising to find it had over 700 of my photos already on it!)  It took ages and I just wondered if there was an easier way - I don't normally have problems and can load on as many photos from my hardrive as I like - but not today!!  Oh no sireee - it didn't want to play!!  Any help or suggestions will be gratefully received!

Thanks for looking and I'll try to get around as many of the workdesks as I can!

Monday, 11 October 2010

Dress Up - October


It's October and I'm still playing 'Dress Up' with Margaret over on her blog Alice and Camilla.  Only two months left then it's all over, how sad will that be!

I thought I'd design my dress this month with an Autumnal feel to it.

I started off with a black card base


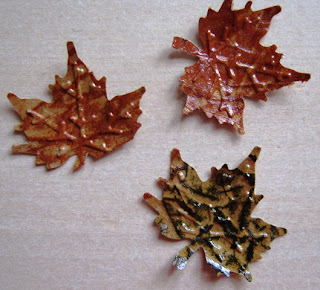
Covered the front of it with silver self adhesive tape (the type electricans use I believe) and embossed it using one of the Ten Second Studio moulds.


I probably should have embossed the tape first and then stuck it onto the card, but forgot about that and embossed it once it was stuck down, so have a lightly embossed finish instead.

I then coloured the embossed dress with alcohol inks - Ginger, Terracotta, Raisin and Gold Mixative.

For the top of the dress, I used part of a necklace I bought in a Charity shop some time ago - I liked the little leaves!  I dabbed the alcohol ink applicator over the leaves roughly, so some have the same colour as the rest of the dress.


The chain is attached to the shoulders of the dress by copper coloured brads.

Here's a close up of what it looks like underneath


The vest part I coloured with some metallic rub on paste.

The weight of the leaves is a little too heavy for the card dress so I think I'll have to re-inforce it at the shoulders for better support.  

  I can just imagine doing a little shimmying dance in it and hearing all the  leaves move about - they make a lovely sound!  LOL

Thanks for looking - 10 down, 2 to go!

Thursday, 7 October 2010

Look Who's Stopped by to say Hello!


It's Santa Claus of course! 

 He's on a tour around the blogs of the participants of the Countdown To Christmas matchbox swap being hosted by Linda on her blog called

His visit is part of a 'Swap For All Seasons Santa Claus Blog-Along Giveaway'!
There'll be an early Christmas present for one lucky person - yay!!!

If you visit Linda's blog, not only will you see some gorgeous altered matchboxes, but you'll hear some lovely Christmas music!

Well, I'd better not keep Santa here any longer as I've a feeling he's going to be busy in the next few months!

(I wonder if he's got my 25 matchboxes in his sack - LOL)


Compendium Of Curiosities - Challenge No. 16 - Wrinkle Free Distress


The current challenge set by Linda on her blog Studio:L3 is to create something using the technique in Tim Holtz' book Compendium of Curiosities, page 33 he calls 'wrinkle free distress' which without going into detail is basically playing about with Distress Inks and a Craft Mat.

Here's a couple of work in progress photos which show the colours of Distress Ink I used for my two large tags.

I went for a Paris theme and the two rubber stamps I used were The Eiffel Tower (554J) by Auntie Amy and Paris Socialite (80436) by Stamps Happen


I also used an unmounted butterfly/Paris postage stamp from Crafty Individuals (got a bit carried away with stamping that on the purple one!)

They're not exactly Paris chic, more Paris grunge but that's quite fitting I suppose for the King of Grunge our craft lord and master Tim Holtz!

If you hop on over to Linda's blog you'll find links to lots of other examples of this technique as well as details of some fantastic prize giveaways!

Thanks for looking .... or should that be
'Merci pour le regard'
(thanks Yahoo translator - lol)