Pages

Showing posts with label dress form. Show all posts

Friday, 23 January 2015

PaperArtsy Blog Challenge No. 2: Shiny Stuff


I'm joining in again with PaperArtsy's next challenge
"Shiny Stuff".
Here's what Leandra says on her blog
"it's time to get in touch with your inner magpie! We are exploring metals, mica, beads, wire, jewellery, paint effects, Treasure Gold, in other words, all things shiny, rusty or metallic."

All the details may be found here
along with a YouTube video from Leandra which is what
actually inspired me to join in.

I made a paper sewing fairy called Phoebe (that name
apparently means bright, radiant and shining).

I'll show below with photos and not too many words how I made her.

 
 I used a stamp from Character Constructions
and some shiny plumber's tape which I roughed up a bit.


 I stamped onto card painted with 
Fresco Finish 'Sage' colour and stamped
the bodice part again onto the silver tape and layered it up.
The face is moulded from air dry clay.

 
I made the wings and bobbin feet with more of the silver tape
 stuck onto card and embossed with my Big Shot machine.
I coloured them randomly with a mixture of Viva Precious Metal Colour
and Alcohol Inks.  


 She's looking shiny!  
Next I added the arms with silver brads
and machine stitched the wings on.


With some 0.6 gauge silver coloured jewellery wire, I made
a cage to replicate the bottom of the dress form.

 
 Attached the face and wool hair with E6000 adhesive
and a wire hanging

(a hairbrush wouldn't go amiss!)
   

 Not very shiny at the back, but it's always good (I think) to
see how things are put together.

This current challenge runs for another 15 days so there's
plenty of time to get involved.

Thanks for looking :)

Monday, 22 November 2010

Footstool Revamped


Here's the old footstool revamped.

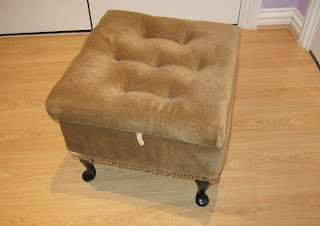
This is how it looked before


I've had this footstool for many years and when we moved into our present house (about 11 years ago) I put it under my craft desk pushed to the back and that's where it stayed - until now!

Here's what I did to transform it


Took the top and legs off and carefully ripped off the fabric.


I kept the old foam cushioning on.


I removed the covered buttons from the lid.


I used the old fabric as templates - much easier than measuring everything!


I covered some buttons with the black material and laid them out onto the fabric for the lid.


Using my trusty old staple gun, I attached the fabric around the bottom.  I love this fabric, but unfortunately didn't have enough of it to do the lid too.
The fabric is called Dress Forms by Michael Miller.


To cover the inside of the lid, I used the same fabric as for the top, it is a cream coloured brocade I've had in my material stash for ages.   As the 'Dress Form' fabric is black and white, I wasn't sure if using a cream coloured top was a good idea, but I think it works fine.  Ideally, I should attach some trim to cover the staples up - but that's for another day.


Apart from finding the corners difficult to re-cover - getting an acceptable mitred look wasn't easy, the only other thing I had trouble with was attaching the buttons to the top.  I decided to use the thread from the original buttons, but it wasn't long enough so I couldn't pull the thread through to the inside of the lid - doh!!  This means that the buttons are not as tight or as cushioned as they should be.  However, as I'm not a professional upholsterer, nor will I ever be, I think I did pretty well!

I didn't have to do anything to the legs (apart from dusting them!) as they were already black.


I've gone a bit mannequin mad lately as I bought a wire mannequin standing approx three foot high and two smaller ones which can be wall mounted.  One day soon I hope to make over the sewing area of my craft room and then all of these mannequins and the footstool can be nicely displayed -  if only I could get Kirsty Allsop in to give me a helping hand!

Thanks for looking x